• Skip to primary navigation
  • Skip to main content
  • Skip to primary sidebar
  • Skip to secondary sidebar

Plant Based U

Fat-Free and Low Fat Vegan Plant Based Recipes

  • Home
  • Recipes
    • Raw Vegan Recipes
    • Cooked Vegan Recipes
    • Eat to Live Dr. Fuhrman Recipes
  • Products
  • Coaching
  • Videos
  • Articles
  • About
    • What Is Low Fat Vegan/Whole Foods Plant Based
    • Resources
  • Contact

broccoli

Fb-Button

Plant-Based Broccoli Mushroom Rotini Casserole (Vegan Pasta)

September 15, 2013 by Veronica Grace 17 Comments

Fb-Button


BroccoliMushroomBake (3)

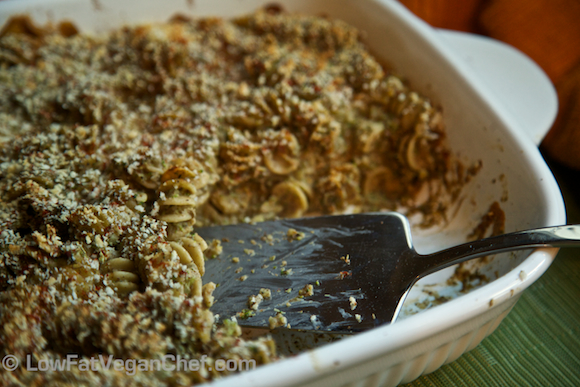
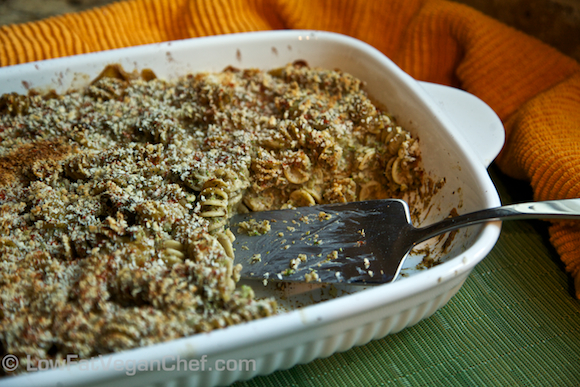
I had some leftover broccoli florets and mushrooms in the fridge I needed to use up and thought of baking them into pasta casserole. Then I thought, what if I were to chop these up super super small and HID them in a cheezy sauce? Then I would have a fantastic recipe for those who have a hard time getting their children or spouses to eat their vegetables!

So that’s why this recipe was designed and it’s not quite as indulgent as just pasta in cheezy sauce. It has some delicious veggies hiding in it too!

BroccoliMushroomBake (2)

I like to use rotini pasta because the spirals hold onto the sauce and really grab it, plus it has a nice texture to it too. I recommend following these directions, but if you don’t have a food processor you can chop the veggies into very very small pieces instead so they don’t overwhelm the pasta. Also make sure not to use too much broccoli or you will end up with a more pungent pasta creation (as broccoli contains sulfur it can be strong smelling).


So give this healthy pasta bake a try and let me know what you think!

BroccoliMushroomBake (1)

Vegan Broccoli Mushroom Pasta Bake

Serves 6

Ingredients:

1 cuo/150 grams of broccoli
8 oz. sliced mushrooms
1 medium onion, peeled and quartered
3 large cloves of garlic
16 oz. whole wheat rotini, elbows or spirals
1/4 cup panko bread crumbs
1/2 tsp dried basil
1/2 tsp dried oregano
Paprika to garnish
White pepper to garnish
Herbamare or salt to garnish

Cheezy Sauce:

2 cups almond milk
1/4 cup cashews
1 large clove of garlic
1/3 cup nutritional yeast
5 tsp Genmai brown rice miso paste
1 tbsp cornstarch
1 tsp smoked paprika

Directions:

Preheat oven to 350 F.

1. Bring a large pot of water to a boil. Add salt if desired. Cook rotini or spirals for about 6 minutes just until al dente. (Do not overcook)

2. Pulse, broccoli, mushrooms, onions and garlic separately in a food processor (unless you have a very large one) until broken into tiny pieces. Add to a large wok or sauté pan and cook for 7 minutes until soft. Add a little water or vegetable broth as necessary to cook.

3. Blend cheezy sauce ingredients in a blender and taste test. Adjust seasonings if desired with more salt and pepper or smoked paprika.

4. Drain rotini and add to sauté pan and pour sauce over (or combine in a large pot if you don’t have a lot of room). Toss to coat.

5. Pour into a large casserole pan. Top with panko breadcrumbs and smoked paprika.

6. Bake for 20-25 minutes.

7. Serve and enjoy!

Additional Tips:

This recipe is best served fresh, but if you need to reheat it rebake it or else the panko bread crumbs will be mushy.

Have you ever made a plant-based baked pasta casserole before? What do you put in it? 

Filed Under: Casseroles, Cooked Vegan Recipes, Pasta Tagged With: basil, broccoli, cheese sauce, mushroom, oregano, pasta, rotini, soy-free

20 Min To The Table: Asian Vegetable Tofu Stir Fry with Chinese Garlic Ginger Sauce

August 11, 2013 by Veronica Grace 14 Comments

Fb-Button

Stir fry may be something many of you have made before, but I guarantee you’ve never made it with my homemade Chinese Garlic Ginger Sauce recipe. I’m going to show you how to make stir fry without any oil, but with tons of flavour. With fresh garlic, fresh ginger and a little soy sauce you can make your own delicious stir fry sauce so there’s no need to rely on store bought ones with MSG and high fructose corn syrup. You can also make it in advance to use later on and just store it in the fridge.

I’m not a fan of store bought dressings or bottled sauces because of the questionable ingredients they often contain so hopefully with my video you’ll see you can make your own and have them be just as tasty too!

To subscribe to my Youtube channel please click on the video to open it in a new browser and hit the subscribe button beside LowFatVeganChef just under the video. Likes are always appreciated as well!

What I do to save money buying pre cooked brown or white rice (for fast meals) is to cook up a big batch in my Zojirushi 5 1/2 cup rice cooker and then I have enough for that night’s meal plus extra to store in bags or tupperware in the fridge or freezer for later. Just a note, cooked rice holds a lot of moisture and must be eaten within 3 days if left in the fridge due to bacteria growth. So please use it within this time or freeze it for food safety. Also you must let it cool before placing it in the fridge or freezer to minimize the bacteria growth as well.

Additionally if you’d prefer to just buy pre cooked brown rice to always have on hand you can check out Uncle Ben’s Ready Rice Pouch or Steamed Brown Rice Bowls and microwave it shortly before your dish is ready.

AsianVegetableTofuStirFryGraphic

20 Minutes To The Table Recipe for Episode 3

Asian Vegetable Stir Fry with Tofu

Serves 4

Ingredients:

1 package firm or pressed organic tofu, sliced into cubes
1 small onion, peeled and quartered
1/2 red bell pepper, sliced
1/4 green cabbage sliced
3-4 cups broccoli, cauliflower, carrot mix (or stir fry mix)
1 bag of pre cooked brown rice or 3-4 cups fresh cooked (I used homemade)

Chinese Garlic Ginger Stir Fry Sauce

Ingredients:

1/2 cup water
1/4 cup low sodium soy sauce
1/2 cup vegetable broth low sodium
2 tbsp rice vinegar
3-4 tbsp maple syrup or sugar (as needed to balance the spice/acidity)
3 cloves of garlic
1 inch ginger, minced
1/2 tsp granulated onion powder
1/4 tsp white pepper
2-3 tbsp cornstarch (depending how thick you want it)

Directions:

1. Prepare the sauce. You have two options you can either blend it all together and gently heat it until thickened (this does produce some foam from the ginger/garlic fibre so I scooped that off) or you can just mince the ginger and garlic and put everything together in a pan and heat until thickened. Set aside.

2. Prepare the tofu and heat over medium high heat in a non stick pan. Add a little ginger garlic sauce to cook it in. Let it cook for a few minutes while you prepare your veggies.

3. Add the vegetables and stir well. Place a lid over the vegetables and cook 4-6 minutes (depending how big your vegetables are). Taste test, stopping when crisp tender. Heat your rice (if using bagged pre cooked rice) in the microwave for 60-90 seconds.

4. Drizzle in some more sauce and toss to combine.

5. Serve stir fry over rice and drizzle with more sauce as desired.

Enjoy!

What are your favorite stir fry ingredients? What sauce do you usually pair them with? 


Filed Under: 20 Minutes To The Table, How To, McDougall Program, Videos Tagged With: 20 Minutes To The Table, asian vegetable stir fry, broccoli, brown rice, cabbage, Carrots, cauliflower, chinese ginger garlic sauce, fat-free, gluten-free, nut-free, red pepper, tofu

Raw Vegan Recipe: Rock My Broccoli Salad with Orange Hemp Dressing

March 3, 2013 by Veronica Grace 103 Comments

Fb-Button

*Contest is over! I’ve chosen Tina’s name “Rock My Broccoli Salad” for the title!

Hey everyone. So I kind of need your help.

You see, I made a delicious salad the other day and I absolutely loved it, but because it has so many ingredients I couldn’t really decide on what to call it. So I want hear some suggestions from you.

In fact, I’ll even give a little prize to the person who comes up with the best name for this salad recipe. (I’m going to put it in my next salad recipe ebook you see so it needs a catchy title.)

So please let me know what name you think suits this salad and it’s ingredients that make it sound delicious and appetizing. I’ll announce the winner later this week. And since it’s open to everyone (and some of you may have already purchased one or two of my recipe ebooks) I want to offer the winner a copy of any one of my ebooks they don’t already have. So if you’ve been dying for a particular ebook, please don’t miss out on this chance to enter! Plus it’s a fun way for me to get feedback from you.

I usually stick to all raw ingredients when I make my salads and dressings, but not always. This one however is pretty much all raw and super fresh (depending on the cranberries, but you can use something else instead if you wish.)

Once this salad is tossed together with the orange hemp dressing and the avocado chunks get all broken up and creamy, it’s a super tasty and decadent salad, but it’s jam packed full of vegetables and still light. I never use any oil in my salads and try to keep them zesty and flavorful but lower fat at the same time.

If you’re going to make this salad and not use it all in one meal, it’s best to portion it out and keep the remaining dressing separate so it doesn’t wilt the lettuce. Use the dressing within 3 days as it is fresh.

Rock My Broccoli Salad

Serves 2 dinner salads or 4 side salads

Salad Ingredients:

1 small head of broccoli cut into small florets
3 cups baby spinach or spring mix
2 cups romaine lettuce
1 8 oz. package sugar snap peas
1 apple peeled and sliced into match sticks
2 small seedless cucumbers (Persian or Iranian), sliced
1 8 oz. package plum tomatoes, sliced
2 small or 1 large avocado, seeded and sliced into chunks
2 green onions, chopped
3 tbsp pomegranate seeds or dried cranberries

Orange Hemp Dressing:

1 cup fresh squeezed clementine or mandarin orange juice (please don’t use store bought it’s too sour)
2 tbsp hemp seeds
2-4 dates, pitted and chopped
dash of kelp flakes *optional
dash of salt
dash of pepper

Directions:

  1. Arrange salad ingredients into a very large salad bowl as desired.
  2. Combine salad dressing ingredients into a blender and blend until smooth.
  3. Serve salad and top with dressing as desired.

Additional Tips:

Store leftovers in separate containers and consume within 3 days.

**Contest Over**

Name this salad and get a chance to win a copy of any of my recipe ebooks!

Winner: Tina with “Rock My Broccoli Salad” Congratulations Tina!

Filed Under: 80/10/10, Raw Salads, Raw Vegan Recipes Tagged With: apple, broccoli, cucumbers, green onions, hemp seeds, lettuce, oranges, raw recipe, raw vegan salad, romaine, spinach, sugar snap peas

Product Review: Amy’s Bowls Brown Rice & Vegetables

January 23, 2013 by Veronica Grace 1 Comment

Fb-Button

I wanted to do a few reviews on some vegan products my readers might be interested in trying. This one is a frozen dinner by Amy’s and is a brown rice and vegetables bowl.

From Amy’s website “Organic brown rice, tofu and vegetables in a delectable sesame tahini sauce. A flavorful, nutritious high protein meal, containing no dairy or gluten. Satisfying at any time of the day. (Amy’s dad eats his for breakfast on the way to work.)”

Let’s check out the ingredients:

ingredients

So the ingredients look pretty good overall, considering most frozen dinners have things like high fructose corn syrup, sugar, MSG, preservatives and chemical flavors in them. It also has food ingredients first and not oil or sugar, so this is good.

nutritional info

Now let’s check out the nutritional info.

This is not a low fat meal, but it is not a high fat meal either. The fat in this product is mainly coming from olive oil, tahini and safflower oil. I’m not sure why there are two kinds of oil in this food. That’s the only thing I find strange about this product.

Now let’s see what it actually looks like out of the package.

frozen, removed from box

Microwave directions: Cut slit in package and microwave on high for 4-5 minutes.

Now that my frozen dinner is hot and ready it’s time to eat!

While it has a nice mild taste and some colour, I would say it tastes more like a creamy mushroom sauce rather than a sesame tahini sauce (tahini means sesame paste.) The tofu had a nice flavor. It kind of reminded me of the tofurky flavor, but maybe that’s just me.

In any case it’s a nice mellow flavored bowl and if you like mushrooms, broccoli and flavored tofu you will like this. Here’s a little review breakdown for you.

Basic Nutritional Info: 260 calories 9 grams of fat 31% fat by calories

Price: $3.74 USD on sale ($4.99 reg) In Canada about $6-$7

Taste: 4/5

Texture: 3/5

Healthfulness: 3/5

Looks: 3/5

Low fat: No, medium fat recipe

Vegan: Yes

Gluten Free: Yes

Soy Free: Yes

Nut Free: Yes

GMO Free: Yes

Would I eat it again? Sure for a quick mini meal on the go. But I won’t likely buy it again soon as I enjoy homemade rice bowls better.

What could be improved? More rice so it’s not so moist and wet (and more filling) and remove the two kinds of oil which is kind of overkill and unnecessary.

*Disclosure, I’m doing this review of my own accord, I was not given any free product nor was I paid to do this review.

Hope you enjoyed my review! Let me know what you thought of your Amy’s Bowls Brown Rice And Vegetables.

Filed Under: Articles, Product Reviews Tagged With: Amy's Bowl, broccoli, Brown Rice and Vegetables, mushrooms, Review, Sesame Tahini, vegan

Vegan Baked Butternut Squash Macaroni and Cheese with Broccoli and Mushrooms

December 27, 2012 by Veronica Grace 16 Comments

Fb-Button

Sometimes I like to play around with my own recipes and change them up for variety! This is a different spin on my Low Fat Vegan Baked Butternut Squash Mac & Cheese. This time I’ve left out the panko breadcrumbs so you can see all those lovely vegetables inside!

I’ve added lightly steamed broccolini/brocolette (a milder form of broccoli) and sautéed mushrooms to the mix!

So now not only is this probably the healthiest baked mac and cheese ever (cuz it’s oil free, cheese free and gluten friendly) but it’s packed full of nutritional powerhouse vegetables such as butternut squash, garlic and onions (used in the sauce) and broccoli and mushrooms.

This is just one of 60 delicious recipes in my Vegan Comfort Foods From Around The World recipe ebook.

I’m sure kids would love this recipe too because the veggies are fairly mild tasting and covered in sauce!

Vegan Baked Butternut Squash Macaroni and Cheese with Broccoli and Mushrooms

adapted from my Baked Butternut Squash Mac & Cheese in Comfort Foods From Around The World

Note: Because I added vegetables to this recipe, the flavor of the sauce needs to be enhanced so I increased the amounts of seasonings.

Serves 6

Ingredients:

½ medium butternut squash (or 1 2/3 cups cooked and mashed)
16 oz./454 g package elbow macaroni or spirals (for GF use Tinkyada brown rice pasta for best results)
1/4 – 1/2 tsp. salt (*optional for pasta)
1 cup broccoli florets, chopped into little pieces
1 cup mushroom slices, chopped
1/2 – 3/4 cup vegetable broth (for cooking)
1 large onion, diced
4 cloves garlic, minced
3 – 4 tsp. brown rice miso (use a lot more if using shiro/white/yellow miso)
3 cups almond milk (unsweetened original)
2 tbsp. flour or cornstarch
3/4 cup nutritional yeast flakes
1/2 tsp. black pepper
1 – 1 1/2 tsp. smoked paprika
3/4 – 1 tsp. salt (*optional for sauce)

Topping:
1/4 tsp. smoked paprika

Directions:

1. Peel and cube the butternut squash and bring to a boil and steam just until soft. Alternatively you can cook in a pressure cooker at high pressure for 5-7 minutes. Drain well. (Tip, if your squash is hard to peel or cut, pop it in the microwave for 3-4 minutes to soften the skin to make it easier to slice.) Measure out 1 2/3 cup of mashed squash and set aside.

2. In a large pot, bring water to a rolling boil and then add salt if desired. Add pasta and cook just before tender (about 2 minutes less than package directions). Generally it’s about 5 minutes. Drain well in a colander and rinse in cold water. (Do not overcook the pasta.)

3. In a non-stick pan, saute mushrooms in 1/4 cup of water over medium high heat for about 5 minutes. Add the broccoli and a little more water and cook for about 2 minutes. Remove from heat, drain and set aside.

4. Preheat oven to 350 F/ 177 C.

5. In a large saucepan heat vegetable broth over medium heat and add the onions. Cook for 5-6 minutes until tender adding broth when needed to prevent burning.

6. Add cooked onions and any remaining broth from pan into Vita-Mix or food processor, add mashed squash, 1 cup almond milk and miso and blend until combined. Set aside.

7. In the same large saucepan add 1 cup of the almond milk and sprinkle 1 tbsp. of the flour or cornstarch when hot and whisk in. Add the remaining 1 cup of milk and sprinkle in another tbsp. of flour. Whisk this together fast. It’s ok if there are a few small bits of flour still.

8. Cook the sauce for a minute or two until hot and quickly add the squash mixture and whisk in. Heat through another minute or two and then add the nutritional yeast and whisk in. Turn off heat and add remaining seasonings starting with the lower amounts. Taste test and add additional seasonings to your liking.

9. Add drained pasta and mushrooms and broccoli to sauce pot and stir to coat. Spread out in a casserole dish. (If you want to add some vegan cheese like Daiya cheese you would layer some in now and mix it in, but I don’t feel the need to add it personally.)

10. Bake for 20-30 minutes just until pasta is tender. (20 minutes if you slightly overcooked your pasta, 30 minutes if you didn’t)

11. Serve.

Additional Tips:

To save time you can use frozen cubed butternut squash and then cook it and mash it, or use canned butternut squash. Both are sold at health food stores in North America.

Smoked paprika (also called Spanish Paprika) is much more flavourful than traditional paprika, it lends a nice smokey flavor to this cheesy sauce. McCormick makes one, or you can get it at some ethnic or Indian markets.

Brown rice miso paste is the best for this recipe, is has a stronger tangier flavor than the lighter misos. This is what gives the sauce a tangy cheezy flavor. If you don’t use it your sauce will not taste like a cheese sauce.

If you’d like a runnier mac and cheese you can add an extra 1/4 cup of almond milk to the sauce, but you’ll need to add some more seasonings to readjust the flavor.

Have you ever made an oil free, cheese free mac and cheese recipe? What did you use? 

Filed Under: Casseroles, Cooked Vegan Recipes, Dinner, McDougall Program, Pasta Tagged With: almond milk, broccoli, butternut squash, cheezy sauce, cooked, gluten-free, mac & cheese, mac and cheese, macaroni and cheese, mushrooms, pasta, soy-free

Low Fat Vegan Cheezy Sauce For Steamed Vegetables

April 23, 2012 by Veronica Grace 23 Comments

Fb-Button

Low Fat Vegan Chef Cheezy Cheese Sauce For Steamed Vegetables

Today I wanted to share a recipe with you from my upcoming second recipe ebook: Low Fat Vegan Chef Presents: Vegan Comfort Foods From Around The World. All the recipes are done and photographed, I just have to write it and put it together. In total there is going to be about 60 recipes in it all with photos! It should be available in a few weeks, so keep your eyes out if you’re missing some home cooked comfort meals!

As I’m currently in Kauai (our second stop in Hawaii) and pretty much away from the kitchen (aside from throwing together cut up fruit, basic salads and steamed vegetables) I haven’t been making any new actual recipes in a week. I kind of feel like I should be making food, but when you’re on vacation you’d rather be snorkelling, swimming or taking pictures! (If you’re like me I guess!)

I thought this would be a great recipe for those not sure what to put on their steamed vegetables for dinner. Most of you have probably had some sort of cheese, Cheese Whiz or cheese sauce on your vegetables prior to eating vegan and have a craving for something cheese-like at the dinner table. Also sometimes kids (and even grown ups!) like to dip their veggies into a sauce or dip and don’t enjoy eating them plain.

Growing up my mom would always make this homemade butter+flour+milk+grated cheese sauce for us when we had pierogies, ham, mixed vegetables, or even a dish called Welsh Rarebit (essentially a fried egg on toast topped with cheese sauce. Her version anyways and no we’re not Welsh or Polish. I have no idea where these recipes came from!). We loved this sauce. We asked for it all the time, we wanted to pour it on everything and we wanted to dip everything into it.

Pretty much everything about my mom’s cheese sauce that made it delicious isn’t really healthy or vegan, so I wanted to create something that was much much healthier and still tasty for those who miss cheese sauce.

The trick to getting a cheese-like taste in your sauces is to use nutritional yeast (this is yellow yeast flakes that are sold at the health food store, this is not brewers yeast, quick rising yeast nor does it have anything to do with baking) and miso paste. Nutritional yeast has a cheese-like tangy flavour and can be used in sauces, dips, dressings, or even shaken onto salads and pop corn. The miso paste is what gives it a strong fermented salty flavour and gives the cheesiness more depth. Nutritional yeast and salt is really not enough, miso paste is essential. You can find this at the health food store or any local asian market. I usually buy yellow/mild or brown rice miso. I don’t use white shiro miso or red miso. But use what you can find. The miso won’t go bad and will last a while and you can use it for more asian sauces, dips and add to soup stocks or make miso soup with it. If you use my recipe ebooks you will find it in several of the recipes as well.

For this recipe I just used a pre pack of fresh mixed vegetables that I got at the store. I wanted to make it simple for people who are new to preparing fresh vegetables and don’t have a lot of time. You can also cut up your own assorted fresh vegetables, or use frozen vegetables as well. The key is to make sure you don’t overcook them and make them mushy. I am constantly checking on them while they steam and testing them with a knife to see if they are soft in the centre. When they are al dente and ALMOST cooked turn off the heat and take off the lid. The veggies will continue to cook with all the hot steam in the pan and they will be overcooked if you continue to leave the heat on them. Leave the cover off so you dissipate some of the steam. No one likes overcooked veggies! This takes some practice, but if you can set a timer and find out the exact time it takes when the water boils you will make things easier next time you make them. Broccoli is the first to overcook and cauliflower is sturdier so I usually put it in the pot for a minute first and then put the broccoli on top to cook.

Low Fat Vegan Chef Cheezy Cheese Sauce For Steamed Vegetables

Low Fat Vegan Cheezy Sauce For Steamed Vegetables

From Comfort Foods From Around The World 

Serves 3-4 for a side dish of veggies

Ingredients:

1 cup almond milk, unsweetened original (I used Blue Diamond brand. Don’t use sweetened or vanilla)
1/4 cup nutritional yeast flakes
1/4 tsp smoked paprika (available at Indian stores, spice markets and Amazon. McCormick also makes one available at Walmart)
1/2 tsp miso paste
Fresh ground pepper (if desired)
1 1/2 tbsp flour (GF if desired)

Directions:

  1. Add almond milk to a sauce pan and heat over medium (or medium low on gas stove) heat until warm. Sprinkle in the nutritional yeast and smoked paprika. Whisk it in.
  2. Add the miso paste and try to break it up so there are no large clumps. Let it heat through a little and keep whisking it. Taste test and add a little more smoked paprika and some ground pepper if desired. If you add more miso it will make it saltier so use caution. (You want a tangy zesty flavour.)
  3. Gently sprinkle in the flour and whisk in to combine. Try to ensure there are no clumps. Heat through for a minute or two until it’s thickened up. Stir it to prevent it from sticking or burning at the bottom.
  4. Have your steamed vegetables ready or turn off the element and cover to keep warm until your veggies are ready.
  5. Drizzle over vegetables and serve. (Have extra ready for your dinner guests to add more if they wish.)
Variations:
Feel free to use soy milk, rice milk, hemp milk etc as desired. I just have a preference for almond milk and don’t enjoy the taste of soy milk myself. To change some of the flavours in this sauce you could omit the smoked paprika and add some garlic and onion granules instead or add some tabasco or chipotle chili powder to make it spicy.

What do you think of this recipe? Did you ever have cheese sauce before you were vegan? What do you like to use now on vegetables?

Filed Under: Cooked Vegan Recipes, Eat To Live - Dr. Fuhrman Recipes, Green Dishes, Sauces, Side Dishes Tagged With: broccoli, Carrots, cauliflower, cheese, cheeze, gluten-free, miso, sauce, soy-free

Easy Vegan Rainbow Bowl: Steamed Veggies Over Yams & Squash With Peanut Dressing

April 9, 2012 by Veronica Grace

Fb-Button

Low Fat Vegan Chef's Vegan Rainbow Steamed Veggie Bowl With Peanut Sauce

I wanted to have a quick and healthy lunch yesterday, but I did not have any rice ready. So instead I decided to serve my veggies over some delicious steamed yams (sweet potatoes) and Kobocha Squash (Thai/Japanese pumpkin). It’s kind of Macrobiotic, it just doesn’t have rice, beans, or fermented veggies. I guess it’s like a lazy version of a Macrobiotic dish instead.

This is a nutritious and easy way to get a lot of veggies all into one dish. I’ve got broccoli, cauliflower, carrots, asparagus, yams (sweet potatoes) and squash, topped with a light peanut dressing to give it some nice flavour.

Basically my Rainbow Veggie Bowl is like a vegetable stir fry, but with steamed vegetables and nothing is fried! This is an easy meal idea for you when you’re not sure what to make, but just want something that still tastes good while being healthy at the same time. It’s also really easy to use up extra vegetables in the fridge, or use a whole bag of fresh mixed vegetables like I did and then they’re already washed and chopped for you.

You can also make the peanut dressing in advance and then use it throughout the week if you want to make this even quicker.

Steamed Yams (Sweet Potatoes) Kobocha Squash

This is the steamed yams and squash before I topped it with the veggies.

Low Fat Vegan Chef's Vegan Rainbow Steamed Veggie Bowl With Peanut Sauce

Veronica’s Easy Rainbow Veggie Bowl

Serves 2

Ingredients:

1 large yam/sweet potato, peeled and chopped
1 small Kabocha squash, peeled and chopped (Thai/Japanese pumpkin) or 2-3 cups frozen butternut squash cubes
1 12 oz./340 g mixed vegetables (I used broccoli, cauliflower and baby carrots)
1/2 bunch asparagus, ends trimmed and cut in half (or other vegetables as desired)
1/2 recipe of Thin Peanut Dressing (see recipe below)

Directions:

  1. Steam yams/sweet potatoes and squash in a medium-large pot in a steamer basket (if you have one) just until tender.
  2. When yams and squash are starting to cook, place other vegetables into another pot with a steamer basket (if you have one) and steam just until cooked. Be sure to check on them so that the broccoli doesn’t fall apart.
  3. Arrange steamed yams and squash into bowls and top with steamed vegetables. Drizzle with thin peanut dressing and serve!

Variations:

Use any other vegetables you desire instead of the asparagus, broccoli, cauliflower or carrots. You can also use ones like kale, Swiss chard, collard greens, Bok Choy, cabbage, onions, zucchini, etc.

Feel free to top your bowl with other goodies like seasoned tofu, tempeh, or black beans.

Kobacha squash can be substituted with Butternut squash, or even more yams/sweet potatoes if you like.

You can also serve with brown or white rice if you don’t want to use yams or squash.

(Oil-Free) Thin Peanut Dressing For Veggies

Serves 2-4

4 tbsp peanut butter
4 small dates, pitted or 1-2 tbsp of liquid sweetener of choice
1 clove of garlic
2 tsp light tamari or light soy sauce
2/3-3/4 cup water (to thin as desired)

Directions:

  1.  Add all ingredients to a blender and combine. Taste test and adjust seasonings if desired. Use as much or as little water as you like depending on how far you want your sauce to go.
  2. Serve over greens or steamed vegetables.

Additional Tips:

Refrigerate any leftovers for up to 3 days.

Variations:

You can also try almond butter, or tahini if you prefer instead of peanut butter. You can also add fresh ginger or a splash of apple cider vinegar if desired for different flavours.

What do you think of my Easy Rainbow Veggie Bowl with Peanut Sauce?

viagra

Filed Under: Cooked Vegan Recipes, Dinner, Eat To Live - Dr. Fuhrman Recipes, One Pot Meals Tagged With: asparagus, broccoli, cauliflower, easy, gluten-free, Macrobiotic, peanut, quick, soy-free, squash, sweet potatoes

Fat Free Vegan “Clean Out The Refrigerator Fuhrman Soup” or How To Make Homemade Soup From Scratch Easily

February 15, 2012 by Veronica Grace 27 Comments

Fb-Button

Low Fat Vegan Clean Out The Refrigerator Vegan Vegetable Soup Nutrient Dense Soup

FTC Notice: This post contains affiliate links that go towards supporting the blog.

This recipe is featured in my Comfort Soups To Keep You Warm recipe ebook along with 29 other AMAZING vegan soup recipes, vegetable stock recipes, and all the tips and tricks to making ANY kind of soup. It’s going to teach you basically to be a soup making expert and be able to cook delicious healthy meals at home, very easily from what you have around.

Somedays you just don’t know what to make for dinner, or only have odds and ends leftover from previous recipes. You look in your refrigerator and see a few carrots, an onion, some celery, some greens and maybe some mushrooms that have seen better days.


What do you do with it all?

You make homemade vegetable soup of course! This is what I do when I feel creatively drained or uninspired to make a new recipe from scratch.

This is also a great way to eat a “Nutrient Dense” or “Eat To Live” style vegan meal like Dr. Joel Fuhrman recommends. (Check out his books Super Immunity, or Eat To Live, if you already haven’t) Lots of low calorie, high antioxidant plant foods, gently cooked together are wonderful. In Feb 2012 I was at the McDougall 3-Day Advanced Study Weekend, and Dr. Fuhrman was telling us the benefits of eating just 1/2 an onion a day, about 1 tomato and just 1 mushroom and how nutritious these are to add to your diet regularly. He has an amazing wealth of knowledge, and I am definitely going to be making more nutrient dense, low calorie green vegetable based dishes from now on.

This soup is a great way to get more of these antioxidants and phytochemicals into your diet in a fairly easy no-fuss way. It’s also a great vegan cabbage soup recipe that is low calorie and packed with veggies.

It is also especially handy to keep some vegetable broth on hand (low sodium is always preferable) for just such an occasion, so you don’t have to make your own vegetable stock as well when you’re short on time. (When I do have time I like to make fresh vegetable stock every week and keep it in the fridge for daily sautéing and making soup with)


Making your own nutrient dense vegan homemade soup from scratch is quite easy. The hard work is only peeling and chopping your veggies. Basically use what you have and always start cooking the onions and the hardest vegetables first (so peel and prepare those first) and they can start cooking while you finish peeling/washing and slicing the other veggies.

It also helps to have some fresh herbs on hand. My top picks would be thyme, dill, basil, cilantro or parsley. These can easily be used up in soup recipes if you have any stray or wilting bits left, so don’t throw them away.

And as with making almost any homemade soup, I always throw in a few bay leaves. They really add a lot of flavour and are great for seasoning soup, vegetable stock or dried beans.


Basic Ingredients For Making Your Own Homemade Nutrient Dense Soup

  • Low sodium vegetable broth (water and salt is not a good enough substitute for this, low salt bouillon and water will do in a pinch)
  • Any vegetables such as carrots, celery, mushrooms, potatoes, yams/sweet potatoes, golden beets, turnips, broccoli, cabbage, spinach, kale, swiss chard, peas, corn, etc
  • Beans or grains (if desired) white beans, lentils, chickpeas, pinto beans, black beans, barley, rice, pasta, etc (make sure beans are pre cooked, or canned before adding)
  • Fresh herbs/dried herbs like thyme, bay leaf, dill, basil, rosemary, cilantro, parsley, Italian herb seasonings, Herbs De Provence etc
  • Base flavor enhancers like canned tomatoes, tomato paste, coconut milk or almond milk (depending whether you want a tomato-ey or creamy soup) *This is optional
  • Seasonings like salt, pepper, lemon juice, lime juice, sweetener (to balance acidity from tomatoes or lemon if desired) cumin, chili pepper, cayenne, smoked paprika, etc

If you add some things from each category (especially ones that you personally like…) and can season to taste and balance out blandness by kicking it up with some lemon, salt and a little sweetener if desired you will have a great soup on your hands.

Also a trick I have for bringing out sweetness to tomato based soups is to add golden beets to it. Golden beets can be found at your health food store, and some grocery stores or farmers markets. They are becoming more popular nowadays. They look almost like small yellowish turnips, but they are beets! (For one thing they don’t turn your hand red and make a mess) They contain natural sugars that leak out into the vegetable broth, so it balances out the harsh acidity of tomato based vegetable soups and goes really well with beans or barley as well. Just make sure you cut the pieces into little cubes, and start cooking them right away with the onions in broth. They take the longest to cook, so you don’t want them to be crunchy while the rest of your vegetables are soft.


Additional Pointers For Cooking Homemade Soup

If you want a fast soup, cut all your veggies (especially potatoes and beets) into smaller cubes so they cook faster. Always add these first to the pot along with carrots and celery. Fresh hard herbs like thyme or rosemary need to go in at the beginning of the soup. Dried or tender herbs like basil, cilantro or parsley can go in near the end of cooking to retain their flavour. Quick cooking veggies like greens, broccoli, asparagus or cauliflower should be added 3-5 minutes before your soup is done so they don’t fall apart and go mushy. Canned corn is very forgiving and can go in at the beginning of cooking and will hold it’s firmness. Canned beans should go in the last 10 minutes or so of cooking as they are fairly soft already and you don’t want them to be mushy and overcooked. Always salt and pepper your soup at the end. Don’t just keep adding salt every time you stir it. When some of the water dissipates you can be left with an over salted or over spiced soup. Always reserve taste testing for the end when everything’s cooked and you can doctor up the flavour from there. Start with a little salt, pepper, spice, or sweetener and keep tasting and adding until you get it right to your liking. Always use low sodium, sodium free and sugar free canned foods so you can control the salt and sugar content of the soup. Read labels! *Note about adding pastas to soup. I really prefer cooking most pastas separately and then putting it into serving bowls and pouring the soup over it. This makes your soup nice and clear and pretty and reduces the risk of over cooking it. If you do cook the pasta in the soup, it’s going to use up some of the water and make it murky with the starch. Check the cooking time of your pasta and add it part way through the soup when the vegetables are starting to be almost soft enough.


And now my made up on the spot “throw it all in a pot” and cook it soup. This is a great way to get more greens into your diet or use up any extras that you don’t have a recipe planned for. This soup is packed with green vegetables, but is light and refreshing. We ate this by itself and basically ate the whole pot because it’s very low in calories. This is a great first course or “weight-loss soup” as well. Fill up on healthy vegetables!

Low Fat Vegan Clean Out The Refrigerator Vegan Vegetable Soup Nutrient Dense Soup

“Clean Out The Refrigerator” Homemade Vegetable Soup

Featured in Comfort Soups To Keep You Warm by Veronica Grace

Serves 6

Ingredients:

2 litres/quarts vegetable broth, (low sodium or homemade)
1 large onion, diced
4-6 cloves of garlic, minced
1-2 bay leaves
1 tbsp fresh thyme, or 1 tsp dried (or favourite herbs, like dill, basil, etc)
2 carrots, sliced
2 stalks of celery, sliced
1 medium golden beet or turnip, diced small (smaller is better)
1-2 cups of sliced mushrooms
6-8 asparagus spears, ends trimmed and cut into thirds (or other green vegetable of choice like zucchini)
2 cups broccoli or broccolini florets
2 cups sliced green cabbage, or other greens like kale or Swiss chard
handful of parsley, chopped
juice of half a lemon
Herbamare or sea salt and fresh ground pepper to taste


Directions:

1. Add 1 cup vegetable broth to a large soup pot and turn onto medium heat. Add bay leaves, thyme, onions and beets and sauté for 5-6 minutes. Add more broth if necessary to beets until they are almost covered.  (While this is cooking you can continue peeling/slicing your other veggies)

2. Add the mushrooms, garlic, carrots, celery, cabbage and the rest of one carton of vegetable broth. Stir and let it keep cooking over medium-medium high heat for about 10-15 minutes. Add more vegetable broth if needed from the other carton. You want your vegetables to be almost done before adding the broccoli and asparagus. Check on the beets, if they are still too hard keep cooking until they are almost done.

3. Add the remaining vegetable broth and bring it up to a boil. When it’s boiling, turn it back down to medium-medium high and add the asparagus, broccoli and parsley (and any spinach if using). Cook for 2-4 minutes (depending on the size you cut them) and test the broccoli and asparagus for doneness. You don’t want them too wilted or mushy. When done immediately take off heat.

4. Add lemon juice, salt and pepper and season to taste. Adjust seasonings if desired.

5. Serve!


What do you think of this “Eat To Live” style recipe? Have you ever made homemade soup before? What do you do with your leftover vegetables?


Filed Under: *My Recipe Books, Cooked Vegan Recipes, Eat To Live - Dr. Fuhrman Recipes, How To, One Pot Meals, Soups and Stews Tagged With: asparagus, broccoli, cabbage, Carrots, celery, Eat To Live, fat-free, gluten-free, mushrooms, nut-free, soup

Low Fat Vegan Deluxe Dijon Tofu Scramble With Veggies

January 18, 2012 by Veronica Grace 16 Comments

Fb-Button
Low Fat Vegan Oil Free Deluxe Dijon Tofu Scramble With Mushrooms, Onions, Broccoli, Zucchini, Red Peppers

Deluxe Dijon Tofu Scramble With Mushrooms, Broccoli, Pepper and Zucchini

This is by far the best tofu scramble I have ever tasted, including at vegetarian restaurants. It is also the first scramble I have ever made personally. I was really going for something that would be savory and flavourful and have some colour and dynamic to it and not like a plain tofu only style scramble. I guess I wanted to go big or go home, and dove right in.

So I searched around and found great inspiration from my friend Malloreigh’s Semi Famous Tofu Scramble. She puts tons of veggies in her scramble, and I agree it works. So I have made this recipe below A LOT!!! I of course, took out the oil, switched to light coconut milk, and changed some of the seasonings to make this a low fat vegan chef (and Dr. Mcdougall) approved version. I think you will enjoy it just fine without the oil.

Every time someone wants a special breakfast, I make this. My mom and her husband even love it and they are new to tofu and not even vegan. If you’re used to eating eggs, let me tell you this tastes BETTER than eggs because it’s so flavourful, you will think salt and pepper eggs are boring next time you have them.

Some people might think ewh weird eating vegetables for breakfast, but everyone in Asia has soup and vegetables for breakfast, and even Americans have veggies for breakfast! Omelettes are often stuffed with veggies, and so are those potato egg skillet thingies at Denny’s lol. It’s not strange, it’s delicious. Try it! Potatoes do not have to be the lone breakfast veggie any longer.

Here’s my signature version of Tofu Scramble:

Low Fat Vegan Deluxe Dijon Tofu Scramble (with Broccoli, Zucchini, Pepper and Mushrooms)

Serves 4 as a side

Ingredients:

1 package firm tofu, drained (pressed firm tofu is perfect too)
5 tbsp nutritional yeast
1/4 tsp herbamare or salt, or to taste
2 tbsp dijon mustard
2 tbsp maple syrup (or liquid sweetener of choice)
1/2 cup light coconut milk (I use So Delicious SugarFree Original, use unsweetened only please)
1/2-1 onion, diced
2 cloves garlic, minced
2 cups whole mushrooms, chopped (or about 1 -1/2 cups sliced)
1 small crown of broccoli, chopped into half florets
1/2 red pepper, sliced lengthwise and then in half
1/2-1 small zucchini, chopped in half moon thinly (thinner is better to cook faster)

Directions:

1. (Depending on your type of tofu you may or may not need to cut it first before pressing.) Cut tofu into 8 pieces if it’s hard to press with your hands. Squeeze out excess water with your hands or with a tea towel. Crumble tofu into a bowl. If your tofu is easy to crumble, I lay it on a clean tea towel and wrap it up and press all the water out and then crumble it into a bowl. I have used both styles of firm tofu, any firm tofu is good, just get the excess water out. Don’t use silken tofu for this.

2. Add  the nutritional yeast, herbamare or salt, dijon mustard, maple syrup and half of coconut milk. Mix until combined.

3. Next sauté the diced onion dry in a non stick pan or wok over medium heat until soft. Trust me, it will not stick if you have a good non stick pan. (If you don’t have non stick, you can use vegetable broth to cook in) Add the garlic and mushrooms; stir and cook for about 3-4 minutes. (The mushrooms should release water and keep everything from drying out and sticking)

4. Add the crumbled tofu and cook, stirring or tossing gently for about 10-15 minutes. The tofu is very forgiving. You can basically cook the rest of your breakfast while stirring occasionally in your non stick pan without worry. If your non stick pan is not so great, you can add a little vegetable broth or water and in small amounts and keep stirring. You want the tofu to absorb the flavours and cook well without burning.

5. When your other breakfast stuff is almost ready (if you have any), add the broccoli, zucchini, red pepper, and the rest of the coconut milk, mix together and cover with a pot lid. Let it steam for about 5 more minutes until the broccoli is cooked and bright green. Don’t let it burn, add a little more liquid if needed if it’s really dry. You can use extra coconut milk or a bit of water.

6. Taste test and adjust seasonings if desired.  You don’t want your tofu to be too wet, just wet enough that everything can cook and not stick to the pan. Serve right away. I like to eat mine with hash browns or my vegan banana pancakes.

Additional Tips:

Make sure your zucchini is sliced thin enough, you probably don’t want hard crunchy zucchini. If you cut it thicker you can add it right after the mushrooms and cook it with the tofu before you add the rest of the vegetables.

Cook your vegetables until they are the tenderness that you like. Try not to overcook them so the broccoli stays together and looks nice.

Variations:

You can change out any of the vegetables if you don’t like them, or don’t have them. It may sound weird having broccoli for breakfast but trust me, it is delicious and not weird! My family loves it. I think the essentials would be onions and mushrooms in this recipe. You could also throw some spinach in at the last minute to wilt if you like instead of broccoli or zucchini.

If you are feeding more people, you can just up the veggies in this recipe and spread out the scramble. I’ve done that and served 5 people a side serving before fine. If it’s just 2 of you, you can share it with some fruit, toast, pancakes etc and be stuffed!

Add some spiciness to the dish with some tobasco or chipotle chili powder if you want to heat it up.

Low Fat Vegan Oil Free Deluxe Dijon Tofu Scramble With Mushrooms, Onions, Broccoli, Zucchini, Red Peppers

Have you ever made tofu scramble before? What do you think of this recipe?

Filed Under: Breakfast, Brunch, Cooked Vegan Recipes Tagged With: breakfast, broccoli, brunch, gluten-free, mushrooms, nut-free, pepper, tofu, zucchini

Primary Sidebar

Follow Us:

Newsletter

Get The Low Fat Vegan Starter Kit

natural organic skin care line

Free Skincare Samples

Earn Free Crypto At Binance

Earn Free Bitcoin on Gemini Exchange

Earn $10 in Bitcoin With Gemini Exchange
Dr. Fuhrman
Dr. Fuhrman
Dr. Fuhrman

Tags

80/10/10 apple avocado banana blueberries breakfast broccoli Carrots celery chickpeas cilantro corn cucumber Curry dill dinner easy Eat To Live fat-free gluten-free how-to Indian Dishes lemon low-fat mango mexican mushrooms nut-free oil-free pasta pineapple plant-based raw raw vegan rice smoothie soup soy-free spinach tofu tomato tomatoes vegan vegetarian vitamix

Secondary Sidebar

Recipes:

  • Cooked Vegan Recipes
  • *My Recipe Books
  • Breads and Baked Goods
  • Breakfast
  • Brunch
  • Burgers
  • Casseroles
  • Curries
  • Desserts
  • Dinner
  • Dips for Veggies or Chips
  • Eat to Live-Dr. Fuhrman Recipes
  • Engine2Diet
  • Ethiopian Dishes
  • Greek
  • Green Dishes
  • Holiday
  • Indian Dishes
  • Mexican
  • One Pot Meals
  • Pasta
  • Pizza
  • Quinoa
  • Salads
  • Sandwiches and Wraps
  • Raw Vegan Recipes
  • 80/10/10
  • Raw Breakfast
  • Raw Desserts
  • Raw Dips
  • Raw Dressings
  • Raw Entrees
  • Raw Juices
  • Raw Salads
  • Raw Smoothies
  • Raw Snacks
  • Raw Soups
  • Sauces
  • Side Dishes
  • Slow Cooker Recipes
  • Snacks
  • Soups and Stews
  • Spices/Seasonings
  • Sushi
  • Thai
  • Vietnamese

Copyright © 2026 · Foodie Pro & The Genesis Framework