• Skip to primary navigation
  • Skip to main content
  • Skip to primary sidebar
  • Skip to secondary sidebar

Plant Based U

Fat-Free and Low Fat Vegan Plant Based Recipes

  • Home
  • Recipes
    • Raw Vegan Recipes
    • Cooked Vegan Recipes
    • Eat to Live Dr. Fuhrman Recipes
  • Products
  • Coaching
  • Videos
  • Articles
  • About
    • What Is Low Fat Vegan/Whole Foods Plant Based
    • Resources
  • Contact

Low Fat Vegan Baked Butternut Squash Macaroni & Cheese

October 11, 2012 by Veronica Grace 45 Comments

Fb-Button

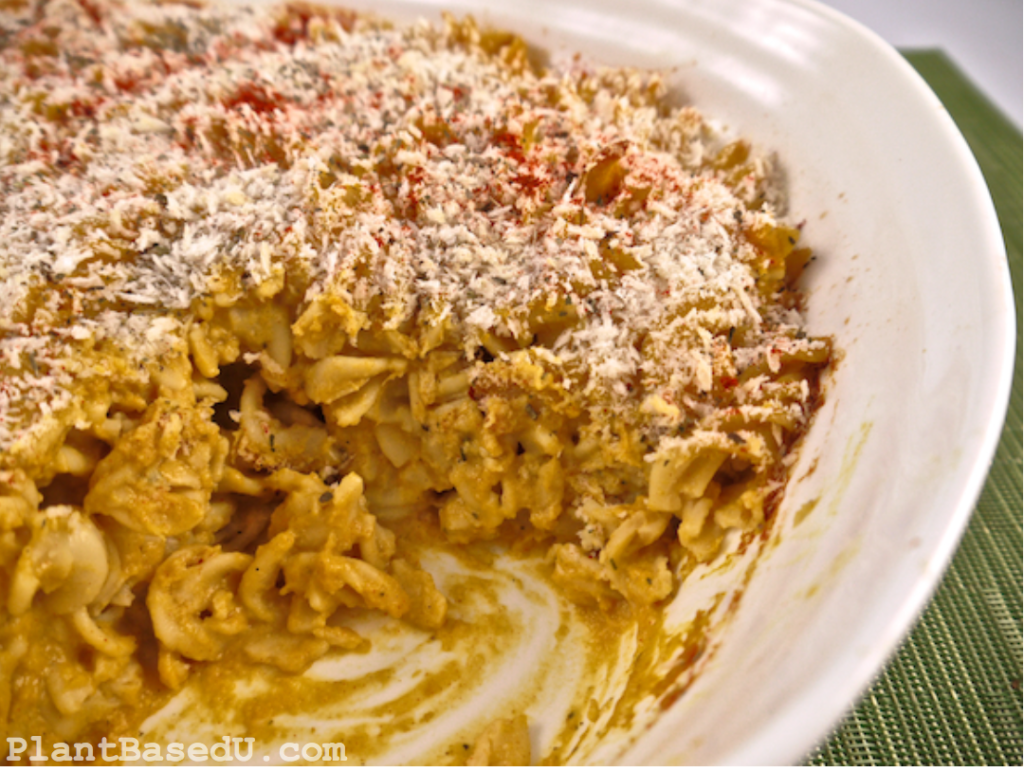
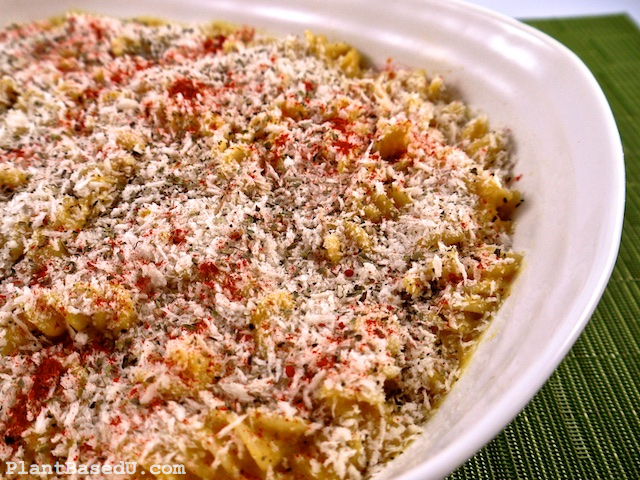
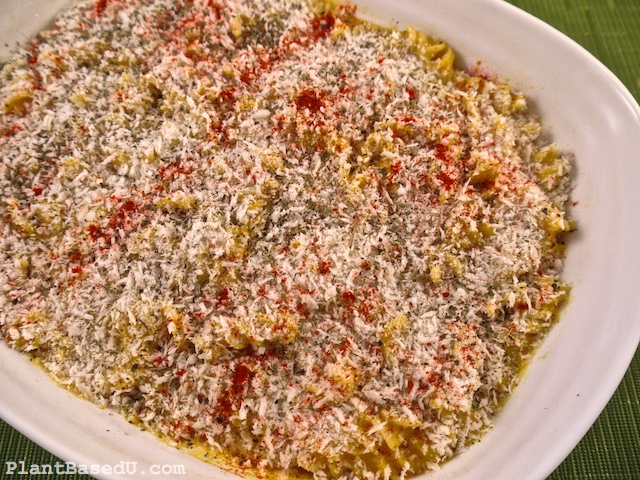
Vegan Baked Butternut Squash Mac and Cheese is one of my faaaaavorite recipes in my new ebook. I make it quite often for my friends and family and it’s super pretty to serve with the panko topping and red and green spices on top.

This is one of my favorite recipes I created for my cookbook

Vegan Comfort Foods From Around The World 3D

And the winner of my new ebook Vegan Comfort Foods From Around the World is…..

Missy!

Congratulations Missy! You will receive a copy of my new recipe ebook Comfort Foods From Around The World.

Now on to my delicious recipe of the week… This one was mentioned numerous times by you guys as one you just HAD to have. So I’m giving you a sneak peek this week before my ebook goes on sale next week.

A delicious vegan mac and cheese recipe can be quite elusive to find. I had actually never eaten vegan mac and cheese until I started playing around with recipes and made one myself. But later whenever I saw vegan mac and cheese while traveling around Canada and the USA I tried some because I was curious what other people had come up with. Generally speaking it’s not that special. Most vegetarian restaurants serve macaroni tossed in oil and a bit of seasoning and then top it with fake (vegan) cheese and then bake it and you end up with a slightly greasy, fairly salty overcooked macaroni that leaves much to be desired. I have yet to be impressed.

I think what makes a great mac and cheese regardless if it’s vegan or not is having some actual cheese sauce in it. All of these vegetarian restaurants skipped this essential part! (I am still baffled as to why they would do this, when classic recipes always have a cheese sauce.)

My vegan mac and cheese recipe actually doesn’t contain any oil or fake vegan cheese at all. I wanted the “cheese” sauce to be amazing and give all the flavour to this classic casserole dish without the need for high fat vegan cheese. I’ve even served this to my mom’s friends and they had NO IDEA that it was vegan or that it didn’t contain cheese. Needless to say whenever I am cooking for people who are skeptical of vegan food this is one of my top 3 go to dishes. (My others are Quinoa Veggie Chilli and Greek Stuffed Peppers which are also in my Comfort Foods From Around The World recipe ebook).

What I love about using squash in the cheese sauce is that it’s a natural thickener because of the high starch content, that way you can easily create a thick creamy sauce without any extra oil or fat and it holds it together nicely.

The 2 essential ingredients for flavoring this recipe would be miso paste and smoked paprika. Miso paste is what gives this sauce a really cheesy flavor, because it’s fermented and tangy. (Nutritional yeast also helps, but you need the miso paste for it to taste like cheese.) My favorite is Genmai brown rice miso paste, you can find it at the health food store in the refrigerated section near the tofu and fake meat products. I have tried using different miso pastes like white (shiro) and yellow miso but they are much milder and I found I had to add a lot more to my recipes. So keep this in mind if you use a different kind of miso paste and use as much as you feel you need when taste testing your sauce. The other ingredient is smoked paprika, I think this is a vast improvement over regular paprika (which I never liked as a child) and I like to include it in any recipes that I’d like a nice mild smokey flavor to. Plus it’s absolutely gorgeous for sprinkling on top of recipes as you can see as well. So do try and find smoked paprika, once you do you’ll want to put it on everything! (and of course check Amazon if you can’t find it locally.)

I know this is recipe is one you’re going to want to make for your family again and again because it’s delicious, yet light. It has all the decadence of mac and cheese without the guilt or the excess calories and you easily serve it with a side salad or steamed vegetable like broccoli to make an even more balanced meal.

This is by far the BEST vegan mac and cheese I’ve ever had (and I’ve tried a lot). It’s so good that all your vegan and omnivore friends will be begging you to make it again and again. And best of all it is very low in fat and much healthier than the original classic.

Vegan Baked Butternut Squash Mac & Cheese

from Comfort Foods From Around The World

Serves 6

Ingredients:

½ medium butternut squash (or 1 2/3 cups cooked and mashed)
16 oz/454 g package elbow macaroni or spirals (for GF use Tinkyada brown rice pasta for best results)
1/4-1/2 tsp. salt (*optional for pasta)
1/2-3/4 cup vegetable broth (for cooking)
1 large onion, diced
4 cloves garlic, minced
3 tsp. brown rice miso (use more if using shiro/white/yellow miso)
3 cups almond milk (unsweetened original)
2 tbsp. flour or cornstarch
3/4-cup nutritional yeast flakes
1/4-1/2 tsp. black pepper
1/2-1 tsp. smoked paprika
1/2-3/4 tsp. salt (*optional for sauce)

Topping:
2/3 cup panko breadcrumbs (or GF)
1/2 tsp. dried basil
1/4 tsp. dried oregano
1/4 tsp. smoked paprika

Directions:

1. Peel and cube the butternut squash and bring to a boil and steam just until soft. Alternatively you can cook in a pressure cooker at high pressure for 5-7 minutes. Drain well. (Tip, if your squash is hard to peel or cut, pop it in the microwave for 3-4 minutes to soften the skin to make it easier to slice.) Measure out 1 2/3 cup of mashed squash and set aside.

2. In a large pot, bring water to a rolling boil and then add salt if desired. Add pasta and cook just before tender. Generally it’s about 5 minutes. Drain well in a colander and rinse in cold water. (Do not overcook the pasta.)

3. Preheat oven to 350 F/ 177 C.

4. In a large saucepan heat vegetable broth over medium heat and add the onions. Cook for 5-6 minutes until tender adding broth when needed to prevent burning.

5. Add cooked onions and any remaining broth from pan into Vitamix or food processor, add mashed squash and miso and blend until combined. Set aside

6. In the same large saucepan add 1 cup of the almond milk and sprinkle 1 tbsp. of the flour or cornstarch when hot and whisk in. Add the remaining 2 cups of milk and sprinkle in another tbsp. of flour. Whisk this together fast. It’s ok if there are a few small bits of flour still.

7. Cook the sauce for a minute or two until hot and quickly add the squash mixture and whisk in. Heat through another minute or two and then add the nutritional yeast and whisk in. Turn off heat and add remaining seasonings starting with the lower amounts. Taste test and add additional seasonings to your liking.

8. Add drained pasta to sauce pot and stir to coat. Spread out in a casserole dish. (If you want to add some vegan cheese like Daiya cheese you would layer some in now and mix it in, but I don’t feel the need to add it personally.) Sprinkle breadcrumbs evenly over top. Sprinkle basil, oregano and paprika to cover.

9. Bake for 20-30 minutes just until pasta is tender. (20 minutes if you slightly overcooked your pasta, 30 minutes if you didn’t)

10. Serve with steamed broccoli or a green salad.

Additional Tips:

To save time you can use frozen cubed butternut squash and then cook it and mash it, or use canned butternut squash. Both are sold at health food stores in North America.

Smoked paprika (also called Spanish Paprika) is much more flavourful than traditional paprika, it lends a nice smokey flavor to this cheesy sauce. McCormick makes one, or you can get it at some ethnic or Indian markets.

To reheat you will want to either microwave it and then toast it in the oven or toaster oven to crisp up the breadcrumbs again, or just reheat in the oven until warm.

 What do you think of this recipe? Have you ever tried vegan mac and cheese before?

This is just 1 of 60 other delicious recipes in my new recipe ebook Comfort Foods From Around The World. It’s going to be released shortly, so make sure you are subscribed to my mailing list to keep up to date on it’s release!

Filed Under: *My Recipe Books, Casseroles, Cooked Vegan Recipes, Dinner, Pasta Tagged With: butternut squash, casserole, dinner, fat-free, gluten-free, pasta, soy-free

Preview Photos From Vegan Comfort Foods From Around The World Recipe Ebook

October 7, 2012 by Veronica Grace

Fb-Button

I’m excited to announce that I’ll have a BRAND NEW recipe ebook coming out soon. This one has been a long time in the making, because I was forever adding recipes and expanding the tutorials included in it. My ebook Vegan Comfort Foods From Around The World has ballooned to over 60 new delicious recipes and includes how to cook every low fat vegan side dish from scratch as well.

This is the one recipe book you’re going to want to dive in and start making recipes from right away. I’ve taken classic rich and decadent (and typically unhealthy) comfort foods and stripped the fat and processed ingredients from it and created a delicious and whole foods based version. There is absolutely NO processed fake meat, NO store bought fake vegan cheese or anything like that in these recipes. These dishes are nutritious and focus on calories from whole carbohydrates and lean vegan proteins such as lentils and beans. It’s also extremely gluten free friendly, and most recipes are soy free and nut free as well. There are a few recipes that use tofu (for tofu ricotta “cheese”), but the majority of the recipes are based on vegetables and whole grains and legumes.

Right now we’re just finishing up some final edits for the ebook and it will be available shortly. But I wanted to kick off with a contest! To enter to win a copy of my new ebook Comfort Foods From Around The World just comment below and tell me what 1 or 2 recipes you are MOST looking forward to trying and why. You can also share what your favorite comfort food was growing up too. I wanted to cover a wide variety of comfort foods, so half of them are American and the other half are European and Asian.

BTW there were just way too many photos to post, so this only HALF of all the recipes that are in the ebook to give you an idea of what I have in store for you. And every single recipe in this book comes with a photo unlike most recipe books, so you can let your eyes decide exactly what you want to make!

Baked Artichoke Risotto
Yam Black Bean Enchiladas
Baked Butternut Squash Mac And Cheezy (contains no fake cheese)
Quinoa Veggie Slow Cooker Chili
Baked Ziti And Greens
Better Than Boston Baked Beans
Black Bean And Corn Tacos
Cauliflower Potato Tofu Frittata
Deluxe Spinach Mushroom Lasagna
Easy Cheezy Shells And Broccoli
Fettuccini Alfredo With Mushrooms And Spinach
Gourmet Chanterelle Mushroom Risotto
Greek Rice Stuffed Peppers
Herbed Lentil Loaf
Holiday Stuffed Acorn Squash
Indian Chickpea Curry (Chana Masala)
Meatless Sloppy Joe’s
Rainbow Nachos with Queso Sauce
Indian Roasted Eggplant Curry (Baingan Bharta)
Pulled Jackfruit Carnitas (faux pulled pork)
Marinated Portobello Bean Burritos
Mashed Potatoes With Gravy
Ratatouille
Costa Rican Rice and Beans (Gallo Pinto)
Rotini Marinara With Chanterelle Mushrooms
Saucy Eggplant Fajitas
Yam And French Lentil Shepherd’s Pie
Spicy Mexican Black Bean Burgers
The Best Cabbage Rolls
Yam Chickpea Spinach Curry

How To Win a Copy: What 1 or 2 dishes are you MOST excited to try and why? Comment below and you’ll be entered to win a copy when Comfort Foods From Around The World is launched. The winner will be randomly selected from all entries. You have until Wednesday Oct 10 at 11:59 pm EST to enter.

Good luck everyone! I know you’re going to love eating these recipes as much as I did making them. Make sure you sign up for my newsletter (the pink box on the right) to make sure you’re notified when my ebook is for sale.

Filed Under: *My Recipe Books, Cooked Vegan Recipes Tagged With: comfort food, cooked recipes, gluten-free, nut-free, recipe book, soy-free

How To Cook The Perfect White Basmati Rice

October 3, 2012 by Veronica Grace 6 Comments

Fb-Button

How To Cook The Perfect White Basmati (Indian Rice)


Long grain Indian Basmati rice is a little different from the typical white rice. It is long and thin and, if cooked properly, can be light and fluffy and delicious. Quite often it can be overcooked and turn out sticky and mushy. Follow these directions for the best white Indian Basmati rice.

Stove top directions for white basmati rice:

1. Measure rice and add to a bowl or mesh strainer. Rinse with cold water 3 times moving the grains around with your hands.
2. Add rice to a bowl and soak with 1-½ times as much cold water for firm rice and double the water for softer rice. Add ½ tsp. of salt for every cup of rice. (This is optional, it helps the grains stay firmer and not stick together.) Let the rice sit for 30 minutes to 2 hours. This helps stop the grains from breaking and sticking together.
3. Transfer rice and water to a heavy bottomed pot and cover with a fitted lid. If it has a steam vent cover it with a small cloth.
4. Turn to high heat and bring to a boil.
5. When it’s at a rolling boil, turn the heat down to a simmer and cook for 12-14 minutes. DO NOT PEEK OR OPEN THE LID.
6. Turn off the heat and let the rice steam for 5-10 minutes.
7. Fluff with a fork and serve.

Rice cooker directions for white basmati rice:

1. Measure rice and add to a bowl or mesh strainer. Rinse with cold water 3 times moving the grains around with your hands.
2. Add rice to a bowl and soak with double the cold water as rice. Add ½ tsp. of salt for every cup of rice. (This is optional, it helps the grains stay firmer and not stick together.) Let the rice sit for 30 minutes.
3. Transfer rice and soaking water to rice cooker pan and set the white rice/regular cook setting.
4. Allow rice to steam for 5-10 minutes when cooking cycle is complete.
5. Fluff with a fork and serve.
For firmer more al dente rice, at the beginning, just rinse in cold water and skip the soaking time. Combine water and rice in a rice cooker and cook on the white rice/regular cook setting.

For cooking brown basmati rice over the stove, use 2 cups of water for every cup of rice. Bring to a boil and cook it covered over a simmer for 35-40 minutes. Let it stand 10-20 minutes after done cooking to finish steaming.

For brown basmati rice in the rice cooker set it to the brown rice setting.
Tip: You can also add any additional Indian spices such as cumin seeds, cardamom pods, mustard seeds, whole cloves, cinnamon sticks, turmeric etc. to the soaking water to flavor your rice.

Filed Under: Articles, How To, Indian Dishes, Side Dishes Tagged With: fat-free, gluten-free, Indian Dishes, nut-free, rice, soy-free

Low Fat Vegan Greek Stuffed Eggplant With Brown Rice

October 1, 2012 by Veronica Grace 22 Comments

Fb-Button

Greek Stuffed Eggplant (Little Shoes)

This summer I had some girl friends over for an end of summer vegan dinner party. I wanted to make something special and I decided on stuffed eggplant. Many people have tried stuffed peppers, but few have had stuffed eggplant, let alone delicious succulent Greek stuffed eggplant.

When I was traveling around the world I fell in love with rustic Greek cuisine. It’s nothing like you find in North America and it’s not all about souvlaki and rack of lamb. Many classic Greek dishes are vegan or vegetarian in nature, so it was a pleasant surprise to find delicious homemade dishes at local tavernas. These are called Melitzanes Papoutsakia or “Little Shoes”. They are often served luke warm or room temperature as is customary in Greece.  They believe that room temperature food is the best for health and this may be why their mezze platters are so popular, where a variety of items can be eaten together at the same temperature.

This is my vegan spin on Greek Little Shoes and you can find it with and without rice. Since this was a main entree I decided to add rice to it and I had some delicious pre cooked brown rice from Hinode in the cupboard so this was pretty easy to throw together.

I have found that it makes a difference in cooking time to precook the eggplant before baking and this way the flesh can soften without having to be cooked with oil. It’s got all the flavor you need by adding fresh herbs without any of the fat.

I served this with salad and my Tuscan Roasted Tomato Chickpea Soup that’s featured in my Comfort Soups To Keep You Warm recipe ebook.

Greek Stuffed Eggplant (Little Shoes)

Serves 8

Ingredients:

4 medium eggplants/aubergine
1 cup vegetable broth (low sodium or homemade)
1 large red onion, diced small
5 large cloves of garlic, minced
4 cups of fresh tomatoes, diced small
1 1/2 cups cooked brown rice (I used Hinode)
3 tsp lemon juice
1 1/2 tbsp fresh oregano or 1 1/2 tsp dried
1/2 cup of fresh dill or parsley, chopped
2 -3 tsp of honey/maple syrup or pureed dates
1/2 tsp salt
Fresh ground pepper
olive oil for greasing pan and sprinkling on eggplant

Directions:

Step #1: Cut tops off of eggplant and slice in half. Bring a large pot of water to a boil and boil eggplant skin side down for 15 minutes. Depending on how large your pot mouth is and your eggplant you may have to boil 4 halves at a time.

Step #2: Once done, take out eggplant and set aside to cool before handling.

Step #3: Preheat oven to 350 F/177 C. Scoop eggplant out of shell carefully and leave a small layer of flesh inside to prevent skin from tearing.

Step #4: Heat a large wok or frying pan over medium heat and add the vegetable broth. Add the onions and sauté for 4-5 minutes. Add the garlic and tomatoes and sauté for 5 minutes.

Step #5: Cut the chunks of eggplant into smaller pieces or mash them. Add to tomatoes and onions and continue cooking.

Step #6: Meanwhile, chop the dill or parsley into small pieces.

Step #7: Add cooked rice, dill/parsley, oregano, lemon juice and salt and pepper to eggplant and tomatoes. If your tomatoes are a little acidic, add honey or sweetener to balance the taste as desired.

Step #8: Place a sheet of parchment paper on a baking sheet and place the eggplant shells skin side down. Fill with tomato eggplant mixture evenly.
Bake eggplant in oven until heated through, about 20 minutes.

Greek Stuffed Eggplant (Little Shoes)

Serve warm with salad, potatoes, or pita and hummus.


Have you ever had eggplant before? What’s your favorite eggplant recipe?

Filed Under: Cooked Vegan Recipes, Dinner, Eat To Live - Dr. Fuhrman Recipes, Greek, Side Dishes Tagged With: Eat To Live, eggplant, fat-free, gluten-free, Greek, nut-free, rice, soy-free, tomatoes

How To Cook Dried Chickpeas On The Stove Or In A Pressure Cooker

September 24, 2012 by Veronica Grace 40 Comments

Fb-Button

How To Cook Dried Chickpeas From Scratch

Tuscan Roasted Tomato and Chickpea Soup from my Comfort Soups ebook

In my recipe books I cook all of my own beans from scratch because it’s less expensive and overall tastes much better. It’s also a good way to control the amount of sodium in your diet and you can cook your beans with or without added salt. For those of you interested in cooking your own chickpeas/garbanzo beans, it’s probably because you’ve gotten hooked on how amazingly delicious (and cheap) it is to make your own.

I recommend making a big batch if you are going to go to the trouble of cooking chickpeas/garbanzos yourself. You can save any leftovers in containers or bags and freeze them for later, or you can just make a double batch of your recipe to use them all up and have meals for the week. The best tip I have for flavorful chickpeas is to use a bay leaf and some seaweed like kombu. When you’re not using salt, (or much at all) beans can taste very bland and these seasonings will greatly enhance the flavor of your chickpeas over the canned versions.

(If you’re looking for directions for cooking non-soaked chickpeas, scroll to the bottom)

Stove Top Directions For Cooking Chickpeas:

Step #1: Pick through your dried chickpeas/garbanzos and remove any bits of rock, broken shells, gross looking chickpeas, random other beans etc.

How To Cook Chickpeas

Step #2: Rinse your chickpeas and place into a large bowl or container. Add 3 cups of water for every 1 cup of beans that you are making. Let the beans soak overnight, or first thing in the morning so you can make them for dinner. I find that chickpeas are fine if they are soaked 5-8 hours, but when I soak them overnight they get overcooked really easily and are disappointing. Try not to soak your beans more than 8 hours if leaving them overnight. If you you do, it’d be better to cook them over the stove as there is less risk of overcooking when you use a pressure cooker.

Step #3: Drain and rinse the chickpeas again in a colander.

How To Cook Chickpeas

Step #4: For cooking the beans on the stovetop add 3 cups of water for each 1 cup of dried chickpeas and bay leaves and/or a kombu seaweed strip for flavour. Bring to a boil and then simmer over medium-medium low heat for 1-2.5 hours until they give to pressure. (it depends on size, small beans cook faster) Make sure they are not crunchy inside and are cooked through. Since each bean has a different size, the cooking times will vary. You can add salt or additional seasonings if desired part way through cooking, but this is optional.

*Non-Soaking Method For Cooking Dried Chickpeas In Pressure Cooker:

If you have an EZ Bean Cooker or digital pressure cooker you DON’T HAVE TO presoak your chickpeas.  You can just rinse them and put them in a pressure cooker and 3 cups of water to every 1 cup of dried chickpeas. Season if desired. Choose the garbanzo (80 min) setting on your EZ Bean Cooker or program for 80 minutes on a digital pressure cooker. Once the timer goes off release the pressure from the valve and let the pressure continue to drop. Drain and use chickpeas as desired.

Regular Pressure Cooker Directions For Cooking Pre-Soaked Chickpeas:

Step #1: Pick through your dried chickpeas/garbanzos and remove any bits of rock, broken shells, gross looking chickpeas, random other beans etc.

Step #2: Rinse your chickpeas and place into a large bowl or container. Add 3 cups of water for every 1 cup of beans that you are making. Let the beans soak overnight, or first thing in the morning so you can make them for dinner. I find that chickpeas are fine if they are soaked 5-8 hours, but when I soak them overnight they get overcooked really easily and are disappointing. Try not to soak your beans more than 8 hours if leaving them overnight. If you you do, it’d be better to cook them over the stove as there is less risk of overcooking when you use a pressure cooker. *Note see below for Non-soaking method for cooking chickpeas.

Step #3: Drain and rinse the chickpeas again in a colander. When using a pressure cooker use enough water to just cover the beans beans and add bay leaves/kombu/a little salt or baking soda if desired and cook for the recommended time on a pressure cooker timing chart. For chickpeas it’s around 5-7 minutes at high pressure in a stove top pressure cooker. (Less if you soaked them 8+ hours) Ultimate Pressure Cooking Chart is a good starting point of reference, but I find their times to be a little high for my gas stove pressure cooker. Always start with a lower time the first time. Once you figure out your perfect time, it’s best to write it down so you remember for next time. (Like the amount of hours you soaked the chickpeas and the number of minutes cooked at high pressure.)

When pressure cooking, keep it on high heat until it reaches full pressure (a steady stream of steam coming out), then reduce it to medium-medium high heat (depending how hot your stove is) and cook for the time indicated in your manual or the pressure cooking chart. I like to play it safe as cook a at least a minute or two less than the charts stipulate. Turn off the heat as soon as the timer goes off. Once the pressure has been reduced and it’s safe to open the lid you can check the beans and see if they are cooked enough.

Note: I do not use oil when cooking my beans with a pressure cooker myself. Most companies recommend that you do so that you don’t get bean foam clogging up the pressure release valve and make a mess. I prefer to cook everything without oil.

To alleviate this foam problem, I use what’s called the “Quick Release Method” by turning off the heat once the timer goes off and then move the pressure cooker into the sink and run cold water on top of the lid until it cools down and the pressurized release opens. This way I do not get any bean foam coming out or making a mess. (This works only for stovetop pressure cookers.)

For the electric pressure cookers it can be a little trickier. You can unplug it and place it in the sink and run cold water on it, or you can put a towel over the top and turn the valve and let out the pressure that way, but there will be bean juice and foam coming out of it and it will soak your towel.

For most things I let the pressure come down naturally, but especially when cooking black beans you need to do the quick release method or else they will be mushy and overcooked. They are very finicky and can only be pressure-cooked 1-2 minutes maximum.

Quick Soak Method For Beans: 

If you forget to soak your chickpeas or beans the night before or in the morning and you want to make a recipe that day you can do the “Quick Soak Method”.

Place your dried beans into a pot and fill with water 3 inches above the beans. Bring to a full boil and then turn off the heat and remove from the stove. Cover and let the beans soak in this hot water for 1 hour. Drain and then cook as above, and your beans should be similar to beans soaked for 8 hours. Please make sure you cook them afterwards, this is just a quick soak method and not a quick cooking method.

Additional Tips For Cooking Chickpeas:

Once your beans are cooked, you can drain them and use them in a recipe, or you can save them in their cooking water and freeze in smaller portions.

Bean cooking liquid is great served over rice or potatoes (if it’s a little seasoned) so don’t just throw it away.

For the best taste in your chickpeas I always recommend using 2 bay leaves, kombu seaweed (if you can find it) and seasoning with a little salt or kelp. If you don’t season the beans at all they will be very bland and probably taste dry and pasty! So I don’t recommend this. Fresh thyme is another delicious suggestion.

Kombu is available at Asian markets and health food stores beside the Nori seaweed. But you probably won’t find this at a regular grocery store though.

Have you ever cooked your own chickpeas before? What’s your favorite chickpea recipe?

Filed Under: Articles, How To Tagged With: chickpeas, how-to

How To Cook The Perfect Brown Rice

September 20, 2012 by Veronica Grace 10 Comments

Fb-Button

How To Cook The Perfect Brown Rice


Brown rice takes much longer to cook than white rice and sometimes it can be confusing why your brown rice didn’t turn out if you have never cooked it before. Brown rice is a whole grain and still contains the outer layer of bran. White rice has just been de-hulled and reveals the white endosperm inside. Any rice that contains the outer layer of bran will look brown and can be called brown “rice”.

So let me show you how to cook brown rice in 2 easy ways, on the stovetop or in a rice cooker.

Stove Top Directions For Cooking Brown Rice:

  1. Measure out rice using a measuring cup. Usually it’s 1/3 cup for a small single serving and 1 cup for several servings. You can always make a big batch in advance and reheat it later or use to make rice salad.
  2. Place rice in a mesh strainer or a bowl and rinse with cool water to remove any debris and excess starch.  Drain.
  3. Add rinsed rice to a pot and add 1 ½ times the amount of rice you have in fresh water. For 1 cup of rice, add 1 ½ cups of water.
  4. Put the pot on the stove uncovered and turn the heat to high and bring it to a boil.
  5. Once your water is boiling, turn the heat to a simmer and cover with a lid. If your lid has a hole or steam valve cover it with a little cloth. Let the rice cook at a simmer for about 20 minutes.
  6. Turn off the heat and let the rice sit and steam for another 10 minutes.
  7. Fluff with a fork and serve.
My favorite rice cooker is the Zojirushi 5 1/2 cup (dry amount) rice cooker. It’s designed in Japan and is like the Mercedez of rice cookers. You can program it to cook rice at any hour of the day, but I personally enjoy being able to set it the night before to cook steel cut oats for whole grain oatmeal in the morning. It also has settings for brown rice, white rice, mixed rice, sweet rice, porridge, cake and steaming vegetables. So if you’re looking for an awesome all in 1 grain cooker I recommend this one. If you’re just a single or looker for a cheaper one there’s also the Zojirushi 3 cup (dry amount) rice cooker. 

Rice Cooker Directions For Cooking Brown Rice:

  1. Measure out rice using the measuring cup that comes with rice cooker. Usually it’s 1/3 cup for a small serving and 1 cup for several servings. You can always make a big batch in advance and reheat it later or use to make rice salad.
  2. Place rice in a mesh strainer or in rice cooker pan and rinse with cool water to remove any debris and excess starch.  Drain.
  3. Add rinsed rice back to rice cooker pan and add water to the corresponding water level for brown rice. If your rice cooker pan does not have a brown rice and white rice water line, use 1 ½ times the amount of rice for water. For example: 1 cup of dried brown rice will need 1½ cups of water.
  4. Turn rice cooker on and select brown rice setting. If your rice cooker does not have a brown rice setting, select white rice or just press on/start.
  5. Once cooking is complete and the rice cooker turns to the keep warm setting, let the rice sit and steam for 5-10 minutes before opening. (This helps your grains stay separated and not stick together when you scoop it out.)
  6. Fluff with a fork and serve.

I suggest setting your rice cooker to cook 1 to 2 hours before your main dish is ready to ensure that it is ready on time. For basic rice cookers it’s about 1 hour of cook time, for the Zojirushi it’s about 2 hours because it adds a soaking cycle (and produces better brown rice.)

Filed Under: Articles, Cooked Vegan Recipes, How To, Side Dishes Tagged With: brown rice, cooked recipes, fat-free, gluten-free, how-to, nut-free, soy-free

How To Cook Dried Pasta

September 19, 2012 by Veronica Grace 1 Comment

Fb-Button

How To Cook Dried Pasta


Although most pasta comes with cooking instructions on the package, sometimes people over cook their pasta and some helpful pointers are in order.

It’s best to cook pasta in clean filtered water as opposed to warm or hot water for the best taste. Although hot water boils faster, it comes from your hot water heater and can taste different from cold water. Use a large glass or stainless steel pot for cooking your pasta.

Step 1: Fill up a large 4-5 quart pot with cool filtered water and bring to a boil. When the water is boiling you can add a little salt if desired. (This is personal preference, omit if you are following a low sodium diet.) Note: it is a myth that salted water boils faster, it in fact takes longer to boil. So add salt only once your water is at a rolling boil.

Step 2:  Add your dried pasta and stir to make sure that it doesn’t stick.

Step 3: Start timing your pasta when the water comes back to a boil.

Step 4: Stir as necessary to prevent from sticking to the bottom of the pot.

Step 5: When pasta is cooked to desired tenderness turn off heat and pour into a colander to drain. Do not rinse.

Step 6: Toss or top with sauce and serve.

Tip: Pasta will clump together if left for more than a few minutes, so use immediately or gently run a little water over it and turn it to break up the pasta clumps.

For cooking pasta that you want to bake in a casserole I suggest cooking it for only 5 minutes. Then toss with the rest of your ingredients and bake at 350F /177 C for about 20-30 minutes until heated through and the pasta is at desired tenderness.

How Much Does Dried Pasta Yield When Cooked?

1 cup of small dry pasta shapes weighs about 4 oz./113.4 g and will make 2 1/2 cups cooked.

4 oz./113.4 g pasta noodles or a 1-inch bunch will make 2 cups of cooked pasta.

Filed Under: Articles, How To Tagged With: how-to, pasta

Fruit and Veggie Smoothie Recipe with Beet Juice

September 10, 2012 by Veronica Grace 14 Comments

Fb-Button

Beet Juice Fruit Smoothie

Sometimes people ask me, “Can I put vegetables into my fruit smoothies?”.  And I say “Well that depends”. I wouldn’t necessarily tell a novice that they should try broccoli or carrots in a smoothie, because those vegetables are pretty hard to blend and you may not like it. Same goes for beets. Don’t just toss them into your blender (unless you have a really high powered one and like a gritty chewy smoothie).  So instead I recommend for those wanting to up the nutrition of their fruit smoothies that you juice some veggies like carrots or beets and use that as a base for blending. That way you can get the added nutrition of veggies in your fruit smoothies just like a V8 juice, but a much much healthier version.

Normally I only use water to blend my smoothies (because I use sweet fruit like ripe bananas I can get away without using packaged fruit juice), but using a fresh pressed veggie juice is an idea you can try as well. We all know you can certainly drink more beets or carrots than you can chew, so once in a while this may be a good option for you to sneak in some more veggies to your diet. (Or the diets of your loved ones!)

I decided to try it out, and it’s a very interesting taste, you get the earthiness from the beets, without the smoothie being too overly sweet and it’s a cross between a smoothie and plain veggie juice. It’s nice actually. So this way you are still keeping a lot of the fiber intact and this helps create bulk and fullness so your smoothie is much more satisfying as a meal than just a plain old juice.

Here is my beet juice smoothie creation:

Beet Juice Fruit Smoothie

Beet Banana Mango Strawberry Smoothie

Serves 1-2

Ingredients:

1/4 cup fresh beet juice (about a bunch of small beets juiced, tops optional)
2 ripe bananas
1/2 cup fresh or frozen mango
1/2 cup strawberries

Directions:

Pour beet juice into blender and add remaining ingredients. Blend on high until smooth. You can either juice the beet tops or you can chop them up and blend them in.

Additional Tips:

Remember beet greens are a little stronger tasting than lettuce so start  out with a little at first and taste test and see what you think. To make this even sweeter add another banana.

Other veggies you can consider juicing to add to your fruit smoothies:

  • carrots
  • golden beets
  • cucumbers
  • celery
  • greens (but you can always blend them in too)
  • other mild veggies

I don’t recommend strong vegetables from the brassica family such as broccoli, cabbage, Brussels sprouts, cauliflower etc.  You CAN however make a savory blended salad or savory veggie stew if you use things like tomatoes for the base and skip the fruit.  I just don’t find strong sulphur containing vegetables go well with fruit.

Have you ever had beet juice or beet greens in a smoothie before? What did you think?

Filed Under: 80/10/10, Eat To Live - Dr. Fuhrman Recipes, Raw Juices, Raw Smoothies, Raw Vegan Recipes Tagged With: bananas, beets, fat-free, gluten-free, mangoes, nut-free, raw recipe, soy-free, strawberries, vitamix

Is Your Favorite Salad Dressing Making You Fat?

September 6, 2012 by Veronica Grace 10 Comments

Fb-Button

Today I want to talk to you about something that could secretly be sabotaging your weight-loss goals. Something so popular in America many people don’t even think twice about eating regularly. Some may even think that it’s OK to eat or even “harmless”.

I’m talking about store-bought salad dressings and the fact that they are probably making you fat… or at least keeping you fat!

Those creamy, oily, sugary processed salad dressings that come in hundreds and hundreds of different flavors could be keeping you fat.America is convinced that although salad is health food, the only way to choke down bland and boring lettuce is to slather it in rich decadent dressing.

I really don’t like store bought dressings. I actually despise them and almost NEVER use them.

I’ve had so many salads in my life that pretty much any store bought salad dressing turns my stomach. Even those oil-free supposedly “healthy” salad dressings (which in no way shape or form are even remotely healthy.)

 The top 3 Reasons Why Store Bought Salad Dressings Are Bad For You:


#1. Classic Dressings Are Oil/Mayo/Cream Based

Often times creamy dressings have even MORE calories than pure oil. How can they manage to make a dressing worse than pure concentrated fat? By adding high fructose corn syrup to it!

Check out the calorie count of some popular salad dressings:

Calories and Fat in 2 TBS Caesar Salad Dressing
150 cals       16 g

Calories and Fat in 2 TBS Thousand Island Dressing
140 cals       13 g

Calories and Fat in 2 TBS French Dressing
120 cals       12 g

Calories and Fat in 2 TBS Olive Oil
120 cals       14 g

Now while you may think that 100-200 calories of dressing is not a big deal, I want you to ask yourself, when was the last time you had a gigantic salad and only used 1 or 2 TBSP of dressing? It is extremely hard to make the dressing stretch that far and give your salad enough flavor. Many lunch salads come with 2-4 oz of salad dressing. Did you know that’s the equivalent of 4-8 tablespoons? That can be an extra 300-600 calories in your dressing alone!

A green salad with some vegetables might have between 50 and 100 calories depending on how many vegetables you add to it. If you’re also tossing some nuts, avocado, cheese, bacon or chicken onto that salad as well you can be adding another 200-500 calories and your “innocent” little lunch salad is looking rather indulgent compared to a fast food hamburger (which is mostly bread anyway and lower in fat). A high fat diet has been shown time and time again to negatively impact those with heart disease, diabetes, cancer, and many other common diseases.

P.S. Check out my healthier raw vegan Caesar salad dressing recipe.

photo from 123RF

#2. Rich High Calorie Dressings Prevent You From Losing Weight

Most women think that the key to losing weight is to skip their regular lunch fare and just have a salad for lunch. Well as we learned above, what you put in your salad and what dressing you choose really matters in terms of calorie and fat content. Drizzling dressing haphazardly over your daily salad is not going to help you reach your weight-loss goals if you already have a problem with portion control and late night snacking.

#3. Store Bought Dressings Are Mass Produced And Contain Questionable Ingredients

Many dressings are based on 3 things, oil/fat, vinegar and high fructose corn syrup. Next they add in artificial flavourings, colours and preservatives and salt. None of these items are good for you, and they are all 100% refined. While the low calorie dressings may seem like a “better” choice, they are still based on vinegar and high fructose corn syrup, and let’s face it, you deserve better than that to build your body with. Artificial colours such as “caramel” (also used in colas) are added to many store bought dressings to make it look better but caramel colouring has been labeled in California as “known to the state to cause cancer or reproductive toxicity.” 1.

So what is the solution then?

Figure out how to MAKE your own tasty and nutritious salad dressings from WHOLE FOODS and healthy fats. It’s a good idea to learn how to master both low calorie and nut based dressings so you have a variety to choose from and you don’t have to eat the same ones week in and week out.

For this weekend only I’m giving away a copy of ’70 Healthy Salad Dressings’ when you buy the GOLD package of my new ebook ‘Simply DecadentSmoothies’. Essentially you are getting 2 ebooks for the price of one and access to over 120 whole foods recipes you can make in any old blender in 5 minutes or less.

I have to say I much prefer homemade salad dressings to store bought ones. Even though they take a few minutes to prepare and don’t last for months in the fridge they are infinitely tastier and better for you. Also instead of adding nuts to my salads, I prefer to blend nuts or seeds into my salad dressings instead of using oil. Ingredients like hemp seeds, tahini (sesame seed butter) almond butter and chia seeds are some of my favorites. I also make some really tasty fat free salad dressings with fresh citrus juice and
vegetables.

If you make salad dressing just once every 3 days you’ll be well on your way to having a heart healthy AND waist line friendly salad that will help you achieve your weight loss goals.

So get in your kitchen and start blending your way to a healthier trimmer you with ‘Simply Decadent Smoothies’ and for this weekend only get ’70 Healthy Salad Dressings’ as your bonus to keep.

What’s your favorite homemade salad dressing recipe?

Filed Under: Articles, Obesity, Raw Dressings Tagged With: article, obesity, salad dressing

(Low Fat Vegan) Easy Mini Lasagna Casserole

September 4, 2012 by Veronica Grace 55 Comments

Fb-Button

Mini Vegan Lasagna Casserole

Who doesn’t love lasagna right? Well what about vegan lasagna?

Unless you’ve had it at a vegetarian restaurant chances are you haven’t had much vegan lasagna in your life, so that’s why I want to share this delicious recipe with you!

This past week a friend of mine was staying with me and we were going through all my cupboards (I have a lot of them!) and were trying to see if there was something we could throw together for lunch without going to the store. I have a plethora of the basics plus a smattering of random ingredients I never got a chance to use up yet so we had a lot of possibilities.

She asked if I had a box of lasagna noodles and I admitted “No unfortunately I don’t have any” but while rummaging I did find a bag of mini lasagna noodles I got from The Gourmet Warehouse in Vancouver. I thought they looked so cute and it would be neat for a mini lasagna casserole sometime, but I just never got a chance to use them before.

We also found some jars of pasta sauce, along with some tofu and frozen spinach so we were pretty much covered to make a basic casserole. One of the things that makes preparing healthy meals at home easy is making sure you have things like canned tomatoes or pasta sauce, dried noodles, frozen veggies and a variety of seasonings to work with.

So we whipped this vegan lasagna casserole together and it didn’t take very long at all which was great because we were starving! LOL.  I have a lasagna recipe that’s coming out in my next ebook (called Comfort Foods From Around The World) that I’m trying to have ready by the end of this month and it was SO much quicker to put together than that so I was pretty impressed.

The mini lasagna noodles are not really essential for this recipe, any pasta will do, but for the photos’ sake it helps to have the pretty ruffled edges. 🙂 You can also break regular lasagna noodles into chunks, or use more common noodles such as penne if that’s all you can find. It’s pretty much going to taste the same, just have a different texture and mouth feel. Some specialty stores or gourmet kitchen supply stores might carry mini lasagna noodles so keep your eyes peeled.

I like to keep my lasagnas fairly healthy so I omit the vegan processed cheese or nut cheese and just make a homemade tangy tofu ricotta instead. (This also keeps the fat and salt content much lower too.) I have tried both regular firm and silken tofu for my vegan ricotta and I have to say that the silken tofu wins hands down. It’s just a nicer texture, creamier and melts in your mouth like real ricotta. Feel free to use whatever tofu you prefer but I really think silken tofu makes a difference especially when you’re looking for a creamier texture in your cheese-less vegan lasagna.

Scroll down for the recipe…

(Low Fat Vegan) Easy Mini Lasagna Casserole

Serves 8-10

Ingredients:

1 454 g/1 lb. package mini lasagna (mafalda, or similar) noodles *GF if desired
2 709 g/25 oz jars pasta sauce (mushroom, garlic, basil flavored etc.)
1/4 cup chopped basil
2 packages firm silken tofu, drained (I used mori-nu)
8-10 cloves of garlic, minced
1/2 cup-2/3 cup nutritional yeast
3 tbsp miso paste (Genmai brown rice)
1-2 tbsp lemon juice
1 283g/10 oz. package of frozen spinach thawed and moisture squeezed out

Directions:

1. Preheat oven to 350 F (176 C)

2. In a large 4-5 qt. pot bring water to a boil and then add 1 tbsp salt and stir. Add mini lasagna noodles (or pasta of choice) and cook for about 5-6 minutes (less for smaller pasta). Stir occasionally to prevent noodles from sticking to bottom of pot. Drain and rinse to remove excess salt if desired. Let noodles cool slightly before handling (because you’re going to be layering them in.)

3. In a mixing bowl, crumble the tofu and add the chopped basil and seasonings adjusting the nutritional yeast and lemon to your tastes. Add the spinach and mix together.

4. In a large 9×13 lasagna casserole pan (or 2 smaller pans) pour in some sauce just enough to cover the bottom of the pan. Next layer in 2-3 layers of noodles (you can make it as neat or messy as you like) and then top with the tofu/spinach mixture. Add another layer of sauce and spread it out so it covers everything.

Middle layer with sauce on the bottom, 2 layers of noodles, tofu ricotta and spinach, and sauce.

Start the next layer with 2-3 more layers of noodles and repeat twice more. Cover the top layer with the remaining sauce and make sure all the noodles are covered. Garnish with some tofu/spinach mixture or vegan cheese if desired (optional)

5. Bake at 350 for 30-45 minutes until noodles are al dente or at desired tenderness. Allow lasagna to cool for 5-10 minutes before serving so the sauce thickens.

6. Serve with your favorite salad or garlic bread.

Let the mini lasagna casserole cool slightly before serving

Variations:

Add a chopped onion and a pound of mushrooms and sauté with a little soy sauce and brown sugar or maple syrup and mix in with the spinach. Add some vegan cheese like Daiya cheese for a more decadent option (increases the fat content though). Use a different type of pasta like giant shells or rotini or fusilli. Use homemade tomato sauce seasoned with your favorite flavors like garlic, basil, oregano, mushrooms, onions etc.

 Mini lasagna casserole baked and ready to serve

Mini Vegan Lasagna Casserole

Bon appétit!

Have you ever had vegan lasagna before or tried mini lasagna noodles before? What do you think?

Filed Under: Cooked Vegan Recipes, Dinner, One Pot Meals Tagged With: fat-free. nut-free, lasagna, noodles, pasta, spinach, tofu, tomatoes

  • « Go to Previous Page
  • Page 1
  • Interim pages omitted …
  • Page 15
  • Page 16
  • Page 17
  • Page 18
  • Page 19
  • Interim pages omitted …
  • Page 28
  • Go to Next Page »

Primary Sidebar

Follow Us:

Newsletter

Get The Low Fat Vegan Starter Kit

natural organic skin care line

Free Skincare Samples

Earn Free Crypto At Binance

Earn Free Bitcoin on Gemini Exchange

Earn $10 in Bitcoin With Gemini Exchange
Dr. Fuhrman
Dr. Fuhrman
Dr. Fuhrman

Tags

80/10/10 apple avocado banana blueberries breakfast broccoli Carrots celery chickpeas cilantro corn cucumber Curry dill dinner easy Eat To Live fat-free gluten-free how-to Indian Dishes lemon low-fat mango mexican mushrooms nut-free oil-free pasta pineapple plant-based raw raw vegan rice smoothie soup soy-free spinach tofu tomato tomatoes vegan vegetarian vitamix

Secondary Sidebar

Recipes:

  • Cooked Vegan Recipes
  • *My Recipe Books
  • Breads and Baked Goods
  • Breakfast
  • Brunch
  • Burgers
  • Casseroles
  • Curries
  • Desserts
  • Dinner
  • Dips for Veggies or Chips
  • Eat to Live-Dr. Fuhrman Recipes
  • Engine2Diet
  • Ethiopian Dishes
  • Greek
  • Green Dishes
  • Holiday
  • Indian Dishes
  • Mexican
  • One Pot Meals
  • Pasta
  • Pizza
  • Quinoa
  • Salads
  • Sandwiches and Wraps
  • Raw Vegan Recipes
  • 80/10/10
  • Raw Breakfast
  • Raw Desserts
  • Raw Dips
  • Raw Dressings
  • Raw Entrees
  • Raw Juices
  • Raw Salads
  • Raw Smoothies
  • Raw Snacks
  • Raw Soups
  • Sauces
  • Side Dishes
  • Slow Cooker Recipes
  • Snacks
  • Soups and Stews
  • Spices/Seasonings
  • Sushi
  • Thai
  • Vietnamese

Copyright © 2026 · Foodie Pro & The Genesis Framework