• Skip to primary navigation
  • Skip to main content
  • Skip to primary sidebar
  • Skip to secondary sidebar

Plant Based U

Fat-Free and Low Fat Vegan Plant Based Recipes

  • Home
  • Recipes
    • Raw Vegan Recipes
    • Cooked Vegan Recipes
    • Eat to Live Dr. Fuhrman Recipes
  • Products
  • Coaching
  • Videos
  • Articles
  • About
    • What Is Low Fat Vegan/Whole Foods Plant Based
    • Resources
  • Contact

Desserts

Fb-Button

Low Fat Vegan Chocolate Banana Silken Tofu Pudding

July 31, 2017 by Veronica Grace 3 Comments

Fb-Button


Hey everyone!

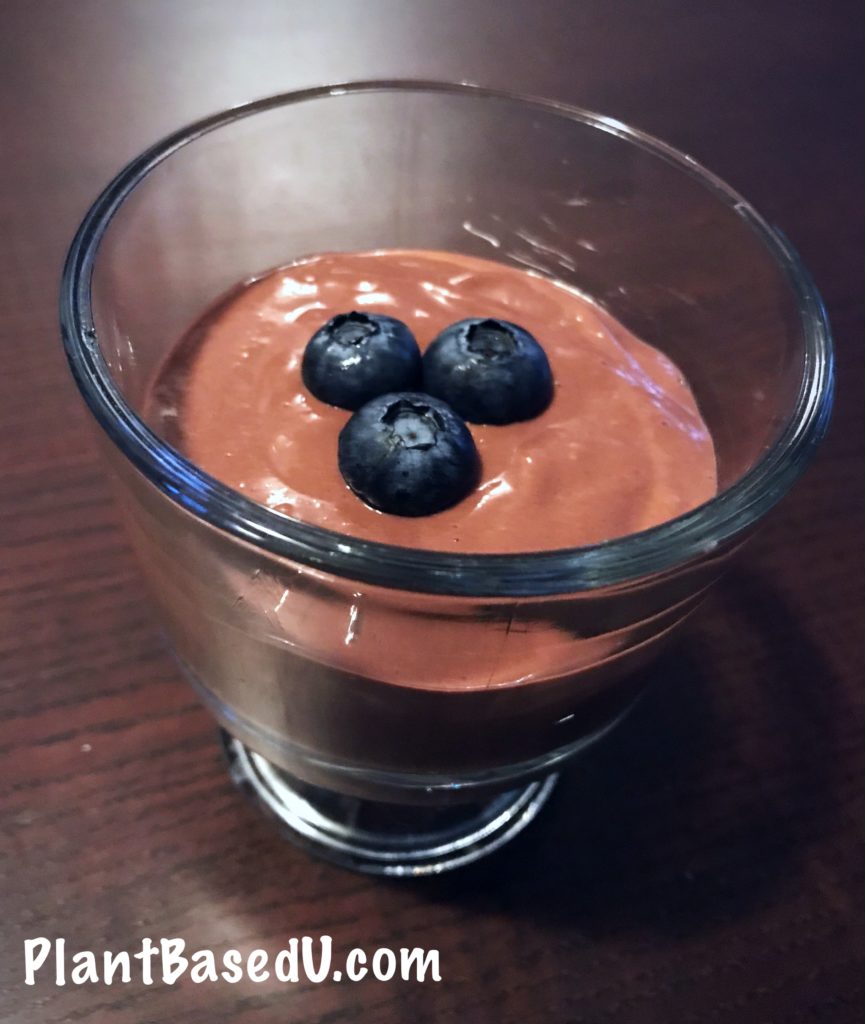
Here is a super easy recipe for those of you looking for a plant based dairy free version of chocolate pudding, perhaps a lot healthier and cheaper than some of the store bought versions like Belsoy or Silk.


I use Mori-nu Silken tofu, I find the firm style is a bit better and save the soft version for sauces like my Alfredo sauce. You can add more or less banana if you like, just make sure it is ripe (lots of yellow spots on it) before using so that it is sweet and not starchy and sour. You can also use a frozen banana if you like.

5.0 from 2 reviews
Save Print
Low Fat Vegan Chocolate Banana Silken Tofu Pudding
Author: Veronica Grace
Recipe type: Dessert
Cuisine: Vegan
Prep time:  1 min
Cook time:  1 min
Total time:  2 mins
Serves: 4 servings
 
Ingredients
  • 1 package of Mori-Nu Silken Tofu - Firm
  • 4 tbsp maple syrup
  • 1 ripe banana
  • 4 tbsp of cocoa powder
Instructions
  1. Place the ingredients into your blender or Vitamix in the order listed and blend. (If you have a low power blender you may need to add a few tablespoons of plant milk to get it to blend.)
  2. Pour into pudding cups or tupperware
  3. Place in refrigerator for 1 hour until firm.
  4. Serve with your favorite fruit!
3.5.3226

Filed Under: Cooked Vegan Recipes, Desserts Tagged With: banana, chocolate, chocolate pudding, maple syrup, tofu

Plant-Based Chocolate Banana Cream Pie – Oh My! (Dairy-Free and Vegan!)

September 1, 2013 by Veronica Grace 20 Comments

Fb-Button


Ok so you may or may not know but I try not to make desserts very often! You see I don’t like to tempt myself by keeping things like this in the house as I used to be addicted to candy and baked goods as a kid. But occasionally I make desserts for special occasions or for guests and I came up with a healthier version of one of my favorites. Chocolate banana cream pie.


You see plain old banana cream pie doesn’t do it for me… no, no I like to coat the crust in a little melted dark chocolate and drizzle some on top for good measure. But this is a special treat! I don’t eat chocolate every day and certainly not desserts.

Here’s what the final product looks all sliced up and pretty!

I also made a coconut milk whipped creme to top it off with as well, but this is optional. If you are looking for a lower fat dessert you can certainly skip the coconut milk whipped cream. I have never made coconut whipped creme before so I wanted to try my hand at it. Turns out it helps to actually own egg beaters! (which I don’t… hah) So mine ended up being a little flat and not really whipped… but it still tasted great nonetheless. So I recommend using egg beaters (the kitchen tool not the product!) to make whipped cream.

Ok so now I’m going to show you how you can make a basic banana cream pie with fresh ripe bananas, almond milk and vanilla pudding. Then I’ll give you the option of using dark chocolate and/or coconut whipped cream. That means you can totally choose how to build your banana cream pie to your tastes and dietary needs. So if you are on a strict diet don’t throttle me please! This is a special occasions recipe and sometimes you want to blow your guests away with a totally vegan and plant based treat.

Compared to the original non vegan recipe this is definitely “reduced in guilt”. 🙂


There’s a new print function installed on the blog, click the print icon at the top of the post and you can edit the text to print and remove the photos if you like as well.

Vegan Chocolate Banana Cream Pie

Serves 8-10 (depending how big the slices are)

Pie Ingredients:

1 graham cracker pie crust (look to see if it contains honey- if concerned, many don’t)
3 oz. semi sweet baking chocolate (dairy free)
3 bananas, ripe
2 cups almond milk or other non dairy milk
1 package vanilla pudding mix (not instant the stovetop kind)

Coconut Whipped Cream Ingredients *optional

1 can coconut milk (regular, not light)
2-3 teaspoons maple syrup or confectioners sugar
1/2 tsp vanilla extract or vanilla powder

Chocolate Drizzle Ingredients *optional

1 oz semi sweet baking chocolate (dairy free)

Pie Assembly Directions:

1. Remove graham cracker crust lid. Melt chocolate in a microwave safe bowl for 1 1/2 to 2 minutes.

2. With a spatula carefully spread chocolate mixture over crust, gently dragging it up the sides. Set crust in refrigerator to harden.
3. When chocolate is firm, slice one of the bananas and place half of it on the bottom of the crust. Reserve the other half banana.
4. Blend 2 remaining bananas with 2 cups almond milk in a blender. Add to a saucepan with vanilla pudding mix and cook as directed on package. This makes the vanilla pudding turn into banana pudding with no artificial flavors. (Bring to a boil over medium to medium high heat, stirring constantly until mixture boils.)

5. When thickened pour into pie crust and cool until chilled and set.

If you want the lowest fat version, stop here and serve as is without coconut whipped cream and chocolate drizzle

6. Garnish top of pie with remaining banana slices. Cover and refrigerate for 2-3 hours until set.
7. If desired top with coconut whipped creme and chocolate drizzle, or serve as is for a lower fat version. Instructions below.

Coconut Whipped Cream Directions:
1. Place the can of coconut milk in refrigerator for 6-8 hours, or in freezer for 3-4 hours until really really cold.
2. Place metal bowl and egg beaters or immersion blender stick in freezer for a few minutes.
3. Remove the can of coconut milk from the freezer and turn upside down. Open the can and pour off coconut water. (reserve for another recipe such as a smoothie!)
4. Remove the bowl from the freezer and scoop out the coconut cream with a spatula and add it to the chilled bowl.
5. Whip cream until light and fluffy. Add maple syrup or vanilla extract if desired. Whip again until combined.
6. Garnish or serve.

Chocolate Drizzle Directions
1. In a microwave safe bowl melt chocolate (1-1/2 minutes on high).
2. Drizzle over pie or dessert and serve.

Vegan Chocolate Banana Cream Pie

 Have you ever had chocolate banana cream pie before? Have you ever made a vegan pie at home?

Filed Under: Cooked Vegan Recipes, Desserts, Holiday Tagged With: banana, coconut cream, dark chocolate, dessert, holiday dessert, special-occasion, vegan banana cream pie

Lower Fat Vegan Chocolate Pudding (Stove Top)

July 23, 2013 by Veronica Grace 37 Comments

Fb-Button

Although there are many ways to make your own vegan pudding such as blending avocados and cacao together (for a very high fat raw pudding) or combining silken tofu and melted chocolate (still high fat and has soy and oil) I wanted to make a less “sinful” way to make chocolate pudding. This vegan chocolate pudding recipe is a “better for you” version that I promise will fully satisfy your chocolate or pudding cravings! Anyone can make this recipe, you just need a handful of ingredients and you can also use whichever non dairy milk you like. I used unsweetened original almond milk as I prefer the taste of it versus soy milk, but it’s up to you.

Watch my instructional video below (it’s not very long) and the recipe follows.

Low Fat Vegan Chocolate Pudding Dairy Free Gluten Free

Lower Fat Vegan Chocolate Pudding Stove Top Recipe

Serves 4  (1/2 cup servings)

Ingredients:

2 cups unsweetened original almond milk, or other unsweetened non dairy milk
3 tbsp corn starch
1/4 cup cocoa powder
1/3 cup plus 2 tbsp maple syrup or sweetener of choice
1/2 tsp vanilla extract (I used my own homemade from fresh vanilla beans)

Directions:

1. Take 1/2 cup of the measured almond milk and combine it with the cornstarch and whisk together until there are no clumps.
2. add the maple syrup, cocoa and vanilla to a medium sauce pan over medium heat and gradually add the almond milk and whisk in.
3. Continue whisking and bring to a gentle boil. This will take up to 10 minutes.
4. Stir in the cornstarch slurry and mix well.
5. Reduce heat and continue cooking until thickened into a thin pudding.
6. Remove from heat and pour into serving dishes.
7. Cover bowls with saran wrap and refrigerate until chilled and set (at least 30 minutes).

Enjoy!

I bet you didn’t realize it was so easy to make vegan chocolate pudding did you? I was very impressed with this recipe. It has all of the decadence of a melted chocolate bar, but it much lower in fat. It’s also easy to adjust the flavoring to your liking by adding more or less cocoa and more or less maple syrup. You also can’t taste the maple syrup in this recipe either. I prefer to use maple syrup as my sweetener because it’s more natural. I don’t use agave syrup as it gives me headaches just like high fructose corn syrup does (some argue it’s even worse than HFCS for you as well.)

Oh P.S. You can also use this recipe for hot chocolate and just omit the corn starch! Heat until boiling and serve. Mmm. 🙂

So there you have it. Are you ready to make vegan chocolate pudding? Come to think of it I want some more right now…. 

Filed Under: Cooked Vegan Recipes, Desserts, Videos Tagged With: almond milk, chocolate pudding, cocoa, cornstarch, dairy-free, gluten-free, low-fat, maple syrup, soy-free, vanilla, vegan pudding

Fat Free Vegan Whole Wheat Banana Blueberry Muffins

January 13, 2013 by Veronica Grace 44 Comments

Fb-Button

Oh my… these banana blueberry muffins are delicious. I don’t know about you but I just love the little pop of the blueberries when you bite into them! Mashed bananas (make sure they are very ripe so they mash well) are a great substitute for oil and fat in baked goods.  So I often use them for this purpose. Plus they add a nice natural sweetness as well which is nice.

I use stone ground whole wheat flour in this recipe, but you can use any whole grain flour that you like.  If you want a lighter muffin you can look for whole wheat pastry flour, it’s not as dense as regular whole wheat flour.  For gluten free versions you can use gluten free oat flour or an all purpose gluten free flour.  I still like to use whole grain flour as most gluten free flours are highly processed and more like white flour.

These muffins also freeze well so you can portion them out and save them for later. I love adding blueberries to baked goods and smoothies, but feel free to use any other berries you like instead.

For truly oil free muffins you can use silicone non stick muffin trays, or paper muffin cups. But I like to use the silicone trays so there is no paper waste (and they also get stuck and tear off the muffins.)

Free Vegan Whole Wheat Banana Blueberry Muffins

12 muffins

Ingredients:

1 1/2 cups overripe (fully brown) mashed bananas (about 3 large, 4 medium)
1/3 cup almond milk (original unsweetened)
1/2 cup maple syrup (or 1/4-1/3 cup honey or agave as they are sweeter)
1 tsp apple cider vinegar
1 tsp vanilla extract
2 cups whole wheat flour (or ww pastry flour or GF flour)
3/4 tsp baking soda
1/2 tsp salt
2 tsp ceylon cinnamon (or reg cinnamon)
1/4 tsp ground nutmeg
1 cup frozen blueberries

Directions:

1. Preheat oven to 400 degrees F/ 204 C.

2. Combine wet ingredients in a large size bowl and mix together.

3. Combine dry ingredients (except for blueberries) into a medium size bowl and whisk together.

4. Add dry ingredients to wet ingredients and stir just until combined. Gently fold in the blueberries.

5. Spoon batter into non-stick silicone muffin trays or a lightly oil spritzed muffin tin.

6. Bake for 25-30 minutes until a knife or toothpick in the middle comes out clean.

7. Allow to cool for 10 minutes and then turn out onto a cookie rack to completely.

8. Serve.

Additional Tips:

For a truly sugar free version you can try using more banana and omit the maple syrup/sweetener. For a whole food sweetener you can blend pitted dates with some water to make your own date syrup.

What’s your favorite way to use blueberries?


Filed Under: Breads and Baked Goods, Breakfast, Cooked Vegan Recipes, Desserts Tagged With: baked, banana, blueberries, bread, fat-free, muffins, nut-free, soy-free, whole wheat

Fat Free Whole Wheat Vegan Banana Bread

December 3, 2012 by Veronica Grace 54 Comments

Fb-Button

Banana bread is one of my favorite childhood treats. I remember baking it many times and trying to pack as much banana flavor into it as possible. But traditional banana bread isn’t very healthy. It’s made with white flour, oil, eggs and sugar. It’s also not usually vegan.

So I wanted to make a fat free oil free vegan version of banana bread and this one uses stone ground whole wheat flour. Even though it’s oil free, it’s actually very moist and a very similar texture to regular banana bread. I was really impressed with this recipe.

Instead of sugar I’ve used maple syrup, but you can also use another liquid sweetener such as honey or agave if desired, but since they are sweeter than maple syrup you should use a little less.

The best banana bread is made with VERY ripe bananas, who’s skins have turned black and are very soft. If you use regular yellow or spotted bananas they won’t be sweet enough for this bread. When bananas ripen the natural starch inside is turned into sugar by enzymes, so it’s important to let your bananas ripen a lot before using them.

The key to slicing fresh banana bread is making sure you let it cool completely before slicing it. It makes it easier to cut and you have less chance of tearing it.

Then you can wrap it up or store it in air tight containers.

Scroll down for the recipe.

Fat Free Whole Wheat Vegan Banana Bread

 
1 loaf (12 slices)

Ingredients:

1 1/2 cups overripe mashed bananas (about 3 large, 4 medium)
1/3 cup almond milk
1/2 cup maple syrup (or 1/4-1/3 cup honey or agave because it’s sweeter)
1 tsp apple cider vinegar
1 tsp vanilla extract
2 cups whole wheat flour (or other whole grain, or gluten free)
3/4 tsp baking soda
1/2 tsp salt
2 tsp ceylon cinnamon
1/4 tsp nutmeg

Note: for a sweeter (more traditional) loaf you can add an additional 1/4 cup brown sugar

Directions:

1. Preheat oven to 350 F/177 C.

2. Combine wet ingredients in a large size bowl and mix together.

3. Combine dry ingredients into a medium size bowl and whisk together.

4. Add dry ingredients to wet ingredients and stir just until combined. If you want to add some dry ingredients such as fruit or nuts gently fold them in now.

5. Pour batter into a non stick silicone loaf pan or a lightly oil spritzed metal loaf pan. Use a spatula to smooth out the top. Sprinkle additional cinnamon on top if desired.

6. Bake for 50-60 minutes until a knife in the middle comes out clean.

7. Allow to cool for 10 minutes and then turn out onto a cookie rack to completely before slicing.

8. Serve.

Additional Tips:

If you tend to have bananas that ripen and then turn black before you can use them, you can peel them and place them in a bag or in a plastic container in the freezer. Then take them out and thaw them for this recipe. It’s nice to have overripe bananas whenever you have an incling to make banana bread.

What’s your favorite addition to bake into banana bread? Walnuts? Raisins? Berries?

Filed Under: Breads and Baked Goods, Desserts Tagged With: banana, bread, cinnamon, fat-free, maple syrup, nut-free, soy-free, whole wheat

Vegan Pumpkin Raisin Oatmeal Baked Apples

November 17, 2012 by Veronica Grace Leave a Comment

Fb-Button

This recipe is from www.SkinnyMs.com, they contacted me about swapping a recipe with me for the holidays so I started perusing their site. This photo grabbed my attention right away. It looks like a great alternative to decadent apple pie and is a much healthier guilt free dessert!

I love baked apples, and this one looks amazing! It uses pumpkin butter, which you can find at some stores, or you can make your own using a recipe from OhSheGlows here.

If you don’t want to use pumpkin butter (or can’t find it), you can probably use apple butter which is more common and sold at many health food stores. Even though it’s called “butter” it doesn’t mean it contains any butter, it’s just spreadable like butter!

This recipe was  created by Navika Gangrade of Cooking the Light Way.

You can also double, triple, quadruple this recipe if you like, or just have it as dessert for one!

Pumpkin Raisin Oatmeal Baked Apple

Serves 1

Ingredients:

1 apple
1/4 cup rolled oats, option Gluten Free Oats
1 tablespoon + 1 teaspoon pumpkin butter, divided (homemade or store-bought)
1 tablespoon almond milk
1 teaspoon raisins
1 teaspoon agave nectar, divided (I think maple syrup would be good too)
1/8 teaspoon ground cinnamon
Pinch of ground nutmeg
Pinch of ground cloves
2 tablespoon hot water

Directions:

1. Preheat the oven to 350 degrees

2. Core the apple, hollowing out until the edges are 3/4 inch thick

3. Combine the 1/4 cup oats, 1 tablespoon of pumpkin butter, 1 tablespoon fat-free milk, 1 teaspoon raisins, 1/2 teaspoon agave nectar, cinnamon, nutmeg, and cloves in a small bowl

4. Stuff this mixture into the apple In a small oven-safe dish, stir together the hot water, 1 teaspoon pumpkin butter, and 1/2 teaspoon agave

5. Place apple into the mixture in the dish Bake in preheated oven for 40-45 minutes

6. Ten minutes before finishing, spoon the syrup under the apple back on top of the apple for a nice glaze

7. Serve

Have you ever had baked apples before? Have you ever tried pumpkin butter before?

Filed Under: Breads and Baked Goods, Cooked Vegan Recipes, Desserts, Holiday Tagged With: apple, cinnamon, dessert, fat-free, gluten-free, nutmeg, oats, soy-free

Oil-Free Vegan Fudgey Blackberry Brownies

May 30, 2012 by Veronica Grace 29 Comments

Fb-Button

So these brownies are a little “healthier” for you than the standard recipes (as it avoids added oils, butter and eggs) but they’re not completely sinless. Brownies are treat, let’s face it and sometimes you want to have a better-for-you treat for yourself or your loved ones. I have tried fat free brownies with just cocoa powder, flour, sugar and applesauce but they weren’t really brownies, more like dense little cakes and ended up being just ok and nothing to rave about. These brownies however are delicious!

This recipe is inspired from the Post Punk Kitchen’s Raspberry Truffle Brownies, but I changed the recipe around. I made a big double batch of these brownies because we had a lot of fresh blackberries on hand and I was thinking of something to make for my friend’s birthday and the Canadian edition of Vegan Food Swap.  (If you have a vegan food blog in the USA or Canada and are interested in swapping goodies every month with fellow vegans check it out!)

These vegan fudgey brownies feel a lot more decadent when you eat them than they really are. You may have noticed I try to cram as much fresh fruits and vegetables as I can into my recipes as I don’t enjoy eating a dish without them.

I think you’ll have a lot of fun making these and enjoy them too. You can impress your guests or make them as a little treat for yourself and freeze any leftovers in individual plastic wrapped pieces. The pieces shown below are the size you get if you cut into 9 pieces. You can of course cut them smaller as well.

I even put some extra blackberry pieces on top and it made these turn out very pretty looking, so you don’t need any frosting either.

Oil-Free Vegan Fudgey Blackberry Brownies

Serves 9

Ingredients:

1/4 cup/3 oz./85 grams semi sweet chocolate chips or semi sweet baking chocolate
1/4 cup/59 mL blackberry or mixed berry jam/preserves
3/4 cup + 2 tbsp/~210 mL sweetened apple sauce (plain) (you could probably try adding ripe mashed banana as well)
2 teaspoons pure vanilla extract
1/2 teaspoon almond extract
1 1/2 cups whole wheat pastry flour (or AP white flour. Do NOT use regular whole-wheat or whole grain flour)
1/4 cup cocoa powder (unsweetened)
1/4 tsp baking powder
1/2 tsp baking soda
1/4 tsp salt
1 cup fresh or frozen blackberries, blueberries or raspberries
2 tbsp semi sweet chocolate chips (1.5 oz./43 g)

Directions:

  1. Preheat oven to 350 F/177 C. Line an 8 inch square pan with parchment paper and lightly coat with non-stick cooking spray.
  2. If using fresh blackberries you can chop them in half. Put in the freezer to firm up while preparing brownies. If using frozen ones keep in freezer until ready to use.
  3. Melt the chocolate chips using a double boiler or in a dish carefully in the microwave. Set aside to cool slightly.
  4. In a large mixing bowl, mix together the jam and applesauce. Stir in the vanilla and almond extract and the melted chocolate.
  5. Sift in the flour, cocoa powder, baking powder, baking soda and salt. Mix very well until a stiff batter forms. Fold in the blackberries and chocolate chips.
  6. Spread the mixture into the prepared pan if you can. You may need to use your hands as it’s very thick. Crush some of the berries on top of the brownies if you are having a hard time mixing them in.
  7. Bake for 16-18 minutes for gooey brownies, bake for 20 minutes for slightly drier brownies. (Tinfoil pans will be done at 15-16 min.) A toothpick will NOT come out clean when inserted in centre, this is normal.
  8. Let the brownies come to room temperature and refrigerate for at least 3 hours to firm up and become fudgey inside. Do not serve right from the oven.

Additional Tips:

If you want to use unsweetened chocolate and unsweetened applesauce you will need to add some granulated sugar (don’t use liquid sweetener). Use 1/4-1/2 cup depending on preference. If you like your brownies really sweet you may want to add another 2-3 tbsp of sugar to the existing recipe.

Whole wheat pastry flour or white all purpose flour works best for a lighter brownie (as they are already pretty dense). If you use straight whole wheat or another whole grain flour it will be way too heavy and too dense and have a grittier texture. Make sure you use the suggested flour for best results. Pastry flour is made from soft wheat, white flour is also softer than hard whole wheat or whole grain flour. If you can’t find pastry flour you can try this: To make two cups of pastry flour, combine 1 1/3 cups (185 grams) all-purpose white flour with 2/3 cup (90 grams) white cake flour.

Sifting in the dry ingredients is essential so you don’t get any uneven lumps. Using a large fine mesh strainer to sift works well. (Pour your powders through the strainer and shake. Discard any rough particles that don’t go through.)

For these brownies to be fudgey in the middle they WILL NOT be baked all the way through like a cake or muffin. If you bake them until a toothpick comes out dry in the centre they will be rather dry and like a very dense cake, and thus not fudgey. In the pictures you can see that the center is not baked and has solidified. Once they’re refrigerated they will become fudge-like in the middle and be ready to eat.

FYI I don’t often make desserts or treats, so don’t get all angry and freakout if this recipe isn’t for you. I made these for friends and thought I’d share the recipe in case others were interested in healthier alternatives for those not on strict dessert free diets. 

Filed Under: Cooked Vegan Recipes, Desserts Tagged With: baking, blackberries, chocolate, cooked, desserts, nut-free, soy-free

Low Fat Vegan Apple Strawberry Giant Strudel Pie in Phyllo Pastry

April 1, 2012 by Veronica Grace 17 Comments

Fb-Button
Low Fat Vegan Chef's Apple Strawberry Strudel

Low Fat Vegan Apple Strawberry Strudel In Phyllo Pastry

Now, before you start drooling all over the keyboard on my delicious (lower fat vegan) Apple Strawberry Giant Strudel Pie recipe, I want to make a quick reminder that my new recipe ebook Comfort Soups To Keep You Warm is now available for sale. I am so happy with the response I’ve recieved on this book so far. People are in love with the delicious and filling soup recipes and blown away by my 40+ pages on tips and tricks on exactly how I cook, what you need and how anyone can make soup and even create their own recipes with anything they have in the fridge! It also contains 30 oil free soup recipes and even some additional bonus recipes you won’t want to miss out on. I know you’re family is going to love these soups recipes so much, they won’t even notice they are healthy or vegan!


Ok, I have a very special recipe for you today… This would be GREAT for a special vegan Easter or holiday dessert.

It was my friend’s birthday a while back and he wanted me to make something yummy for dessert that had apples and cinnamon in it. I started thinking, how could I possibly make an apple pie low fat, but that tastes good? Pie crusts have lots of fat in them from margarine or shortening and raw pie crusts are really fatty from using nuts, so neither were a good solution.

I started thinking of apple crumble, but then you still need margarine to make the crumble crispy and delicious too. (Oil free oat crumble turns out like little muffin bits and rises because of the lack of oil, I’ve already tried it.) So I thought, hey I bet a few layers of phyllo (film or fillo) pastry would do the trick and make the apple strudel delicious without being too heavy. I was inspired by Susan’s recipe for Apple cranberry strudel pie.

But most people’s recipes want you to layer on the margarine or butter in between the phyllo and add lots of nuts.


Well PFFFT to them! Because you don’t even have to do that. The trick to getting a crispy phyllo pastry, is well, just baking it and let is crisp up in the heat. It doesn’t even need oil or butter to get crispy and flaky. I’ll show you how!

Low Fat Vegan Chef's Apple Strawberry Strudel

Low Fat Apple Strawberry Strudel Pie

So the key to working with phyllo pastry is to make sure ALL of your fillings and baking dish are ready to go. Phyllo dries out very very quickly and you have to work fast or it can tear and fall apart. I had some phyllo in the freezer that I bought months ago (as I had no idea what I would use it for and it became a little warped and ugly). Make sure you let the phyllo rest for a bit and come up to room temperature if you defrost it overnight in the fridge because it is inflexible when it’s so cold. Even though I ripped some of it… I managed to make it work anyway, even though I had never used phyllo before. See? Just fake it til you make it and you can make this apple strawberry strudel too… Even if you rip the phyllo and make a big mess, as long as you get some layers of phyllo sheets in there it will still taste good.

As always I wanted to pack in some more fruit into it, so I decided to use 2 different kinds of apples and some strawberries as they looked pretty fresh at the store. Who doesn’t love fresh summer strawberries? Anyone? I didn’t think so… I also think this would work well if you had frozen cherries, or really sweet peaches, or pears. I’m going to try an apple-pear combo next.


Although I made a bottom crust and a top for this, I decided that the crust (bottom layers) aren’t necessary to make this strudel tasty. They don’t really crisp up and they all stay flat anyway, and the most important part of the strudel is really the top crust. So next time I make it I’m going to skip the bottom crust.

Also the nuts aren’t really that necessary either, the reason we add a little crumbled “something in between” the layers it to keep them separate so hot air can get to them and crisp up the phyllo sheets. You can easily just use rolled oats and skip the nuts to make the recipe even lower in fat.

Low Fat Vegan Chef's Apple Strawberry Strudel

(Low Fat) Vegan Apple Strawberry Strudel In Phyllo Pastry

Serves 8

Ingredients: 

12 (or 6 if you use no bottom crust) 9 x 14″ sheets of phyllo pastry dough (thaw overnight in refrigerator or 5 hours on the counter)
2 tbsp. almonds or other nuts (optional)
2 tbsp. rolled oats (the big flat type oats)
4 medium apples, peeled, cored, and diced (I used Granny Smith and Golden Delicious)
1/2 cup turbinado sugar (raw cane sugar) or other coarse sugar (not white sugar or powdered sugar)
2 teaspoons  all purpose white flour, unbleached or cornstarch
2 teaspoons maple syrup, honey, agave or brown rice syrup (any liquid sweetener)
1 tbsp. ceylon cinnamon (my favourite available here) or 1/2 tbsp reg. cassia cinnamon
1/4 tsp. nutmeg
1 1/2 cups diced strawberries
2-3 second spray of canola oil or non-stick spray

Cinnamon-Sugar Topping:
1/4 teaspoon ceylon cinnamon
2 teaspoons regular sugar/white sugar


Directions:

Step #1. Preheat oven to 350 F /177 C. Use a rectangular (not square) baking dish and spritz the bottom with non stick spray (only if making a bottom crust, if not omit). Get the box of phyllo out of the fridge and let it warm up before using so it’s more flexible. Don’t take it out of the plastic package until you are ready to use it.

Step #2: Use a food processor or Vitamix to process the nuts and rolled oats until they are coarsely ground. (You can also just use rolled oats and skip the nuts if desired.)

Step #3: In a large sized bowl, toss the apples, turbinado (raw) sugar, flour, liquid sweetener, ceylon cinnamon, nutmeg and strawberries together gently. In a separate small bowl, mix the ceylon cinnamon and sugar together for the cinnamon-sugar topping.

*If you don’t want a bottom crust, you can skip this next part and go to Step #6.

Step #4: Get out a large piece of parchment paper and unroll the phyllo pastry over it (have a damp towel ready to cover the rest) and take out two sheets at a time and place them into the bottom of the baking dish. (Cover the remaining pieces with the damp towel to prevent them from drying out and cracking.) The sheets will probably be too big for your dish, but you can try and lean them on the side like I did. Also you can use scissors and trim any large ends that stick out.

Step #5: Sprinkle a tablespoon of the nut/oats (or just oats) over the phyllo pastry, layer another two sheets, sprinkle 1 tbsp again, and layer another 2 sheets. You will have 6 sheets total for the bottom of your pastry, in 3 layers.

Low Fat Vegan Chef's Apple Strawberry Strudel

As you can see my dish is a little small for the size of the pastry sheets. Feel free to trim.


Step #6: Pour in the apple strawberry mixture on top of the 6th sheet (if using a bottom crust). If you’re not using a bottom crust, just pour the apples and strawberries into the bottom of the baking dish.

Step #7: Cover the apple strawberry mixture with 2 more sheets of phyllo and push the edges down a little. If they are too giant, you can trim them. If the edges of the layers are all crammed together in a bunch at the top they won’t cook and will be like raw dough. So use your judgement, you want some tucked in, but not too much. Sprinkle another tablespoon of the nut/oats mixture and cover with another 2 sheets of phyllo. Repeat and cover with another 2 layers, another sprinkle of nuts/oats mixture, and another 2 sheets of phyllo.

Step #8: Spray just the top layer of phyllo with a 2 second spray of canola oil or non stick spray and with a sharp knife, cut the strudel into 8 pieces. (This is so it doesn’t shred when it’s cooked. It’s better to cut it beforehand.)

Step #9: Sprinkle it with the cinnamon-sugar topping. Ooh doesn’t that look pretty!

Step #10: Bake for 45-50 minutes until the apples are tender. You can test them with a fork after 45 minutes in the middle.


Low Fat Vegan Chef's Apple Strawberry Strudel

Step #11: Allow the strudel to cool a bit before serving (20-30 minutes). Serve warm.

Low Fat Vegan Chef's Apple Strawberry Strudel

Additional Tips:

Use whatever rectangular baking dish you have to make this strudel pie. Mine is like an oval casserole dish, and it worked ok. I could have used a larger dish because the phyllo sheets are a pretty big. I will trim a little of the excess overhang next time. If you use a large lasagna like pan (9″ x 13″), you should be fine and not have so much extra phyllo on the edges.

*To reheat the apple strawberry strudel you have to do it in an oven. You cannot microwave it or the crust will get all soggy and not be flakey anymore.

 Variations:

Use whatever other fruit you like if you don’t want to use strawberries. It’s nice to have two flavours. You could also use some stewed rhubarb. My Nana used to make Apple Rhubarb pie and I loved this combination.

I also made this recipe with apples and Bosc pears. It was quite delicious too!


To Make Traditional Individual Apple Strawberry Strudels

You can also make little strudels with this recipe instead of a giant strudel-like pie.

If you want to make individual strudels, take 3-4 sheet of phyllo pastry per strudel.  Place a large piece of parchment paper (larger than the phyllo) underneath it and fill the bottom side of the phyllo (the long side of the rectangle), but leave a 2″ gap on all sides and then roll the strudel up and away from you until it’s like a burrito. Tuck the short ends of the phyllo under the roll. Spritz with a little cooking spray and top with cinnamon-sugar. Pierce the strudel every 2″ to vent along the top and cover loosely in tinfoil. Bake at 375 F/ 190 C in the centre of the oven for 15 minutes. Take off the foil and bake for another 15 minutes until golden. Remove from the oven and let cool before slicing and serve warm.

Low Fat Vegan Chef's Apple Strawberry Strudel


The top crust of the Apple Strawberry Strudel Pie is really pretty.  You can barely see the bottom crust, but it is there. It’s pretty flat and soggy so this is why I don’t think it’s essential to be delicious.

Low Fat Vegan Chef's Apple Strawberry Strudel

Side view of the apple strawberry strudel. Is your mouth watering yet? Hee hee.

What do you think of my Low Fat Apple Strawberry Strudel Pie recipe?

Also what do you think of the new printer function of the site? Pretty cool huh!


Filed Under: Cooked Vegan Recipes, Desserts, Holiday Tagged With: apple, dessert, holiday, soy-free, special occasions, strawberry, strudel

Fat Free Vegan Valentine’s Day Dessert: Two-Bite Banana Brownies

February 14, 2012 by Veronica Grace 10 Comments

Fb-Button

Valentines Day Fat Free Vegan Two Bite Chocolate Brownies Oil Free

Happy Valentine’s Day Everyone!

Not that I am much of a Valentine’s Day person. It was probably my most dreaded holiday actually! Being single on Valentines Day kinda sucks a little more than just a normal bad day, but cheer up! I have a treat for you… These deliciously fat free vegan Two-Bite Banana Brownies! And if you do have a Valentine this year, they will love you if you make these for them!

My sweetheart told me for my Valentine’s Day gift he was going to clean the whole house for me and take me out to dinner, so I surprised him with one of these yesterday. I’m not much for material things, so thoroughly enjoy being able to just relax after making a big mess in the kitchen after cooking and photographing for you… 🙂

I was tinkering around yesterday trying to come up with something that would still be tasty even when I sucked all the unhealthy fat out of it. We have a winner  for fat free vegan brownies and a great compromise for those that like to have a little treat after dinner, but not something too big or too rich.

The secret to these babies’ extra flavour is the bananas. I have to admit I am totally devoted to banana bread and always will be. And I just love packing banana into whatever baked goods I can, because honestly I never bake. I only bake for you!

Normally you’d expect a really dense rich brownie, or muffin with a chocolate chips in it, but these taste great on their own. They’re also really easy to make and even kids will love them too!

Valentines Day Fat Free Vegan Two Bite Chocolate Brownies Oil Free

This is what they look like un decorated.

Valentines Day Fat Free Vegan Two Bite Chocolate Brownies Oil Free

Mmm… Is your mouth watering yet for my fat free vegan brownies?

Valentines Day Fat Free Vegan Two Bite Chocolate Brownies Oil Free

Fat Free Vegan Two-Bite Banana Brownies

Makes 24 mini muffin tin brownies

Ingredients:

1/2 cup plus 3 tbsp whole wheat flour (or gluten-free flour, see note)
1/2 cup brown sugar
1/4 cup cocoa powder, unsweetened
1 1/4 tsp baking powder
1/2 tsp salt
1/2 tbsp ground chia or flax seed
2 tbsp water
1/2 cup plus 3 tbsp ripe mashed bananas (about 2 large) or applesauce
1 tbsp vanilla extract
Non stick cooking spray

*Note, if making these gluten-free I suggest adding 1/4 tsp of xanthan gum to the recipe to help the batter stick together.

Directions:

1. Preheat oven to 325 degrees F.

2. Combine dry ingredients, except brown sugar and chia in a medium sized bowl.

3. Add 2 tbsp water to a small bowl. Shake in ground chia and stir until combined.

4. Add wet ingredients and brown sugar to another bowl and stir in chia.

5. Add wet ingredients to dry ingredients and stir just until mixed

6. Spray a mini muffin tin with non stick spray.

7. Spoon a teaspoon size amount into each cup, filling about 3/4 full.

8. Bake for 15-16 minutes, or until done in the centre with a toothpick.

9. Let brownies cool in the pan for 10-15 minutes to set up.

10. Remove and place on wire rack to finish cooling.

Additional Tips:

If you don’t have chia or flax, you can try using egg replacer mixed with water, use the equivalent of one “egg”. Really ripe bananas are best for this as they are sweeter and will add depth to the brownies. Almost as dark as you would use for banana bread is good. If you want to substitute applesauce you can, but they will be much plainer tasting and you might want to add a touch more sweetener. These are easily frosted or glazed if serving for a holiday or a kids birthday party. You can easily freeze these in ziploc freezer bags to have a quick treat ready to go.

Valentines Day Fat Free Vegan Two Bite Chocolate Brownies Oil Free

If you’re like me and you’re a “seconds” kind of dessert fan, fear not! These are packed full of fibre and are low calorie too.

Valentines Day Fat Free Vegan Two Bite Chocolate Brownies Oil Free

What are you doing for Valentines Day this year? Have you ever had a vegan two-bite brownie?


Filed Under: Breads and Baked Goods, Cooked Vegan Recipes, Desserts, Holiday Tagged With: banana, chocolate, dessert, fat-free, gluten-free, nut-free

Special Occasions: Holiday Vegan Pecan Pie (Not Low Fat!)

January 4, 2012 by Veronica Grace 3 Comments

Fb-Button

This recipe I am mentioning as a special treat my mom and I made for our family this Christmas. It was the first time my mom was eating vegan for Christmas, and we wanted to make a holiday pie that everyone could have for dessert without dietary restrictions.

We were much too full after eating our Baked Maple Yam Pecan Casserole and Fat Free Vegan Cranberry Apple Stuffing so it wasn’t eaten until much later in the evening, and I waited until the next day. It’s just such a rich dessert!

I found the recipe here, and just a warning, in no way shape or form is this a low fat or oil free recipe! I just wanted to offer my feedback on how this vegan pecan pie came out, and if you are making it for your family who will be having pie anyways, at least you can have a bite or piece while making and serving it!

We did not have a pastry cutter OR a food processor down here, but my mom managed to cut in the Earth Balance and make the crust without too much rolling or mixing.  It was pretty thick and sturdy, not greasy or flaky though and you can tell it’s definitely homemade and not store bought! 🙂

The filling set really well at the sides, but next time I would bake it longer as it was still not firm in the centre. So it did not come out looking like a perfectly cut piece of pie, but everyone that ate it, didn’t care and enjoyed it anyways! It is very rich, so we cut only tiny pieces instead of a standard 6 or 8 pieces that most people do.

I also specially bought whole wheat saltine crackers, because the recipe said to do so, but in an effort to lower the fat content you can use plain saltines as they have less fat in them than the whole wheat ones. (Whole wheat tends to be dryer, so they always add more oil to baked goods). This serves to thicken up the filling and add some strength to it.  You could try adding an extra saltine or two as well, maybe it would be firmer in the middle.

Anyway, this is my first attempt on a vegan holiday pie, and it didn’t turn out too bad! Just make sure to not make it only for yourself and share it with your friends and family!

Filed Under: Cooked Vegan Recipes, Desserts, Holiday Tagged With: dessert, holiday, pecan, pie

  • Page 1
  • Page 2
  • Go to Next Page »

Primary Sidebar

Follow Us:

Newsletter

Get The Low Fat Vegan Starter Kit

natural organic skin care line

Free Skincare Samples

Earn Free Crypto At Binance

Earn Free Bitcoin on Gemini Exchange

Earn $10 in Bitcoin With Gemini Exchange
Dr. Fuhrman
Dr. Fuhrman
Dr. Fuhrman

Tags

80/10/10 apple avocado banana blueberries breakfast broccoli Carrots celery chickpeas cilantro corn cucumber Curry dill dinner easy Eat To Live fat-free gluten-free how-to Indian Dishes lemon low-fat mango mexican mushrooms nut-free oil-free pasta pineapple plant-based raw raw vegan rice smoothie soup soy-free spinach tofu tomato tomatoes vegan vegetarian vitamix

Secondary Sidebar

Recipes:

  • Cooked Vegan Recipes
  • *My Recipe Books
  • Breads and Baked Goods
  • Breakfast
  • Brunch
  • Burgers
  • Casseroles
  • Curries
  • Desserts
  • Dinner
  • Dips for Veggies or Chips
  • Eat to Live-Dr. Fuhrman Recipes
  • Engine2Diet
  • Ethiopian Dishes
  • Greek
  • Green Dishes
  • Holiday
  • Indian Dishes
  • Mexican
  • One Pot Meals
  • Pasta
  • Pizza
  • Quinoa
  • Salads
  • Sandwiches and Wraps
  • Raw Vegan Recipes
  • 80/10/10
  • Raw Breakfast
  • Raw Desserts
  • Raw Dips
  • Raw Dressings
  • Raw Entrees
  • Raw Juices
  • Raw Salads
  • Raw Smoothies
  • Raw Snacks
  • Raw Soups
  • Sauces
  • Side Dishes
  • Slow Cooker Recipes
  • Snacks
  • Soups and Stews
  • Spices/Seasonings
  • Sushi
  • Thai
  • Vietnamese

Copyright © 2026 · Foodie Pro & The Genesis Framework