• Skip to primary navigation
  • Skip to main content
  • Skip to primary sidebar
  • Skip to secondary sidebar

Plant Based U

Fat-Free and Low Fat Vegan Plant Based Recipes

  • Home
  • Recipes
    • Raw Vegan Recipes
    • Cooked Vegan Recipes
    • Eat to Live Dr. Fuhrman Recipes
  • Products
  • Coaching
  • Videos
  • Articles
  • About
    • What Is Low Fat Vegan/Whole Foods Plant Based
    • Resources
  • Contact

brown rice

Fb-Button

Plant Based African Ground Nut Stew (Vegan African Peanut Curry)

November 29, 2017 by Veronica Grace

Fb-Button

Peanut Stew is something I’ve been wanting to make for a long time because it’s so delicious and satisfying. I was perusing online for inspiration and came across One Pot African Stew from MakingThymeForHealth and used that as the basis for my version.

Once you try it I think you’ll agree that it’s incredibly delicious and maybe even inspiration to use as a base recipe for other veggies. I can see white potatoes, zucchini, winter squash, bell peppers and carrots going well with this too. It is ready in about an hour over the stove, or you can try using a crockpot and cooking it slowly while you’re away from work.

Another note: Personally I’m not a fan of super spicy food or jalapeños so I omitted them. If you really love jalapeños then please add them as your heart desires. 🙂


Please give this a try and let me know what you think!

Plant Based African Ground Nut Stew

Ingredients:

1 large onion, diced
5 cloves of garlic, minced
3-inch fresh ginger, peeled and minced
3 teaspoons of roasted ground cumin
1/4 teaspoon of cayenne pepper (or more to taste)
3 tablespoons of tomato paste
1 large yam/sweet potato, peeled and diced into small cubes (1 lb)
3/4 cup of smooth peanut butter (look for low sodium and sugar free)
4 cups of low sodium vegetable broth (plus more for cooking or use water)
1-2 cups of water, depending on desired thickness
1 bunch of kale/collards/spinach*, stems removed and chopped into bite sized pieces
1/2-3/4 tsp Herbamare or Salt (Less if using salted broth or salted peanut butter)
Fresh ground pepper to taste

To Serve:
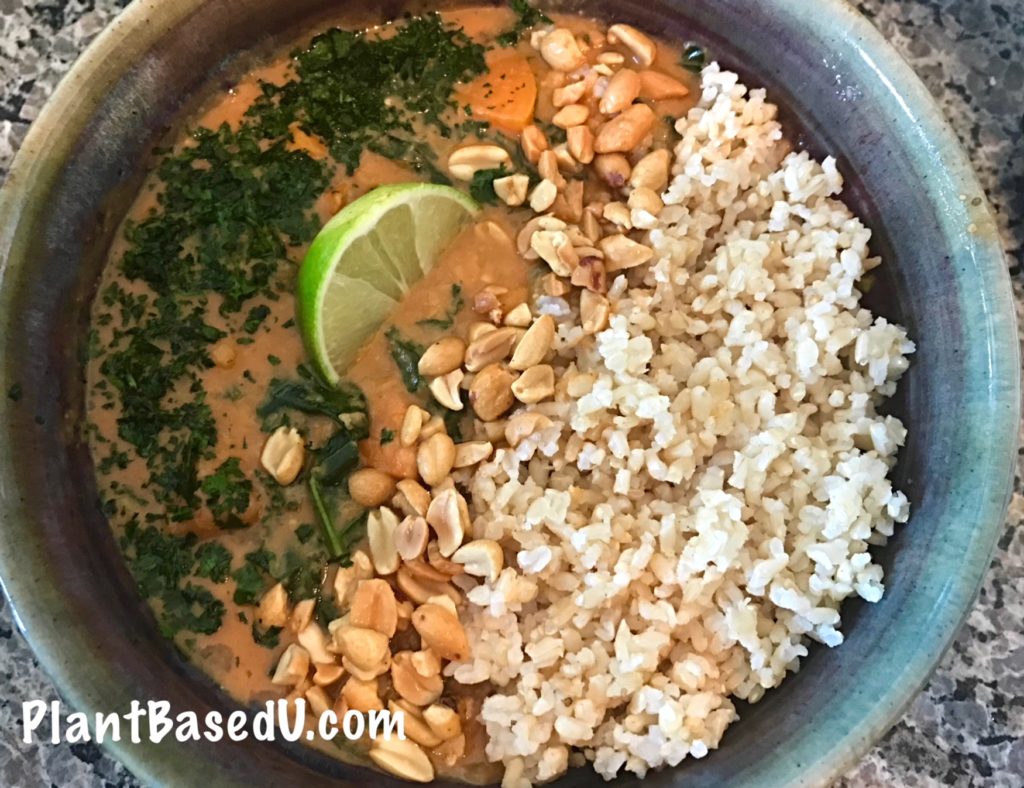
3 cups cooked brown rice
roasted peanuts, broken into pieces (optional)
1 bunch of fresh cilantro, chopped
2 limes, cut into wedges

Directions:

  1. Add water or vegetable broth to a large pot and heat over medium. Add the onions and spices and cook until the onions are translucent, about 5 minutes.
  2. Stir in the tomato paste, yam/sweet potato, peanut butter, broth and water until well combined and bring to a boil.
  3. Reduce the heat to medium low and cover for about 15 minutes. If using collards, add them now and continue cooking another 15 minutes. If using spinach or kale add them when the yams/sweet potatoes are fork tender (after about 25 minutes) and let cook only a few more minutes.
  4. Using a potato masher or ladle, crush some of the yam/sweet potato up and thicken the broth. Cook for another few minutes until creamy.
  5. Serve over brown rice and garnish with peanuts, fresh cilantro and lime juice.

(I cook my rice in a Zojirushi rice cooker)

I’m not sure how this recipe would turn out for those wondering about using PBFit Peanut Butter Powder. If you do try it let me know how it turned out.

Have you ever made a peanut based curry before? What other veggies do you think would go well with this?

Filed Under: Cooked Vegan Recipes, Curries, One Pot Meals Tagged With: brown rice, cilantro, collards, garlic, ginger, kale, peanuts, spinach, sweet potatoes, yams

20 Min To The Table: Rainbow Black Beans and Rice with Garlicky Citrus Kale

August 18, 2013 by Veronica Grace 16 Comments

Fb-Button

Beans and rice are and eaten throughout the Caribbean and Latin America and it’s easy to see why! Beans are so easy and versatile to use in many dishes and can absorb all kinds of delicious flavors when seasoned with delicious spices and herbs. It’s also an extremely affordable and satisfying dish that pretty much anyone can make!

This Rainbow Black Beans and Rice is my take on an old staple, but it will also work for pinto beans or kidney beans so feel free to get creative and use what you have.

And aren’t you cooking fresh beans weekly by now with your EZ Bean Cooker or Digital Pressure Cooker? Aren’t you? I hope so. With weekly fresh beans you have to put them to use and start incorporating them in new recipes! Hopefully 🙂

Also if you’d prefer to just buy pre cooked brown rice to always have on hand you can check out Uncle Ben’s Ready Rice Pouch or Steamed Brown Rice Bowls and use it for this recipe.

Video below:

For more delicious recipes please check out my cookbook Vegan Comfort Foods From Around The World here (and pick up an apron while you’re at it too!) To subscribe to my Youtube channel please click on the video to open it in a new browser and hit the subscribe button beside LowFatVeganChef just under the video. Likes are always appreciated as well! The recipe follows below.

RainbowBlackBeansAndRicephoto

Vegan Rainbow Black Beans and Rice

Serves 4

Ingredients:

1 onion chopped
4 cloves of garlic minced or pressed
1 tomato, diced
2 stalks of celery, chopped
1/2 bell pepper, chopped
2 15 oz can black beans or 3 1/2 cups fresh cooked in a little bean liquid
2 1/2 tsp cumin
1 1/2 tsp Trader Joe’s 21 Seasoning Salute or Mrs. Dash (salt free seasoning)
1 1/2 tsp smoked paprika
1/2 tsp chipotle chili powder
1/2-3/4 tsp Herbamare or salt *or to taste
Fresh ground pepper to taste
handful cilantro, chopped
3 cups pre cooked brown rice (about 1 1/2 bags)
8 Corn tortillas *optional

Garlicky Citrus Kale

Ingredients:

1 large bunch of kale, stems removed
4 cloves of garlic, minced or pressed
1/4-1/2 lime juiced
Pinch of salt
Fresh ground pepper to taste

Directions:

1. Add the onions, tomatoes and garlic to a pan over medium high heat and cook for 2-3 minutes.

2. Add the bell pepper and celery and cook for about 5-7 minutes just until the  celery is just tender.

3. Add the beans, a little bean liquid and the seasonings and let cook 2-3 minutes.

4. Meanwhile, gently steam the kale and minced garlic in a little boiling water for 2-3 minutes just until cooked and set aside.

5. Add the cooked brown rice to the beans and veggies. Stir gently and heat for a minute. Taste test and adjust seasonings if desired.

6. Drain the kale and season with lime juice, salt and pepper.

7. Quickly heat the tortillas in a microwave (30 seconds) or in a flat pan just until warm and pliable.

8. Serve and Enjoy!

Have you ever made rice and beans? What are your favorite seasonings to add?  

Filed Under: 20 Minutes To The Table, McDougall Program, Videos Tagged With: bell pepper, black beans, brown rice, celery, fat-free, garlic, gluten-free, kale, latin, lime, nut-free, rice and beans, soy-free, tomato, tortillas

20 Min To The Table: Asian Vegetable Tofu Stir Fry with Chinese Garlic Ginger Sauce

August 11, 2013 by Veronica Grace 14 Comments

Fb-Button

Stir fry may be something many of you have made before, but I guarantee you’ve never made it with my homemade Chinese Garlic Ginger Sauce recipe. I’m going to show you how to make stir fry without any oil, but with tons of flavour. With fresh garlic, fresh ginger and a little soy sauce you can make your own delicious stir fry sauce so there’s no need to rely on store bought ones with MSG and high fructose corn syrup. You can also make it in advance to use later on and just store it in the fridge.

I’m not a fan of store bought dressings or bottled sauces because of the questionable ingredients they often contain so hopefully with my video you’ll see you can make your own and have them be just as tasty too!

To subscribe to my Youtube channel please click on the video to open it in a new browser and hit the subscribe button beside LowFatVeganChef just under the video. Likes are always appreciated as well!

What I do to save money buying pre cooked brown or white rice (for fast meals) is to cook up a big batch in my Zojirushi 5 1/2 cup rice cooker and then I have enough for that night’s meal plus extra to store in bags or tupperware in the fridge or freezer for later. Just a note, cooked rice holds a lot of moisture and must be eaten within 3 days if left in the fridge due to bacteria growth. So please use it within this time or freeze it for food safety. Also you must let it cool before placing it in the fridge or freezer to minimize the bacteria growth as well.

Additionally if you’d prefer to just buy pre cooked brown rice to always have on hand you can check out Uncle Ben’s Ready Rice Pouch or Steamed Brown Rice Bowls and microwave it shortly before your dish is ready.

AsianVegetableTofuStirFryGraphic

20 Minutes To The Table Recipe for Episode 3

Asian Vegetable Stir Fry with Tofu

Serves 4

Ingredients:

1 package firm or pressed organic tofu, sliced into cubes
1 small onion, peeled and quartered
1/2 red bell pepper, sliced
1/4 green cabbage sliced
3-4 cups broccoli, cauliflower, carrot mix (or stir fry mix)
1 bag of pre cooked brown rice or 3-4 cups fresh cooked (I used homemade)

Chinese Garlic Ginger Stir Fry Sauce

Ingredients:

1/2 cup water
1/4 cup low sodium soy sauce
1/2 cup vegetable broth low sodium
2 tbsp rice vinegar
3-4 tbsp maple syrup or sugar (as needed to balance the spice/acidity)
3 cloves of garlic
1 inch ginger, minced
1/2 tsp granulated onion powder
1/4 tsp white pepper
2-3 tbsp cornstarch (depending how thick you want it)

Directions:

1. Prepare the sauce. You have two options you can either blend it all together and gently heat it until thickened (this does produce some foam from the ginger/garlic fibre so I scooped that off) or you can just mince the ginger and garlic and put everything together in a pan and heat until thickened. Set aside.

2. Prepare the tofu and heat over medium high heat in a non stick pan. Add a little ginger garlic sauce to cook it in. Let it cook for a few minutes while you prepare your veggies.

3. Add the vegetables and stir well. Place a lid over the vegetables and cook 4-6 minutes (depending how big your vegetables are). Taste test, stopping when crisp tender. Heat your rice (if using bagged pre cooked rice) in the microwave for 60-90 seconds.

4. Drizzle in some more sauce and toss to combine.

5. Serve stir fry over rice and drizzle with more sauce as desired.

Enjoy!

What are your favorite stir fry ingredients? What sauce do you usually pair them with? 


Filed Under: 20 Minutes To The Table, How To, McDougall Program, Videos Tagged With: 20 Minutes To The Table, asian vegetable stir fry, broccoli, brown rice, cabbage, Carrots, cauliflower, chinese ginger garlic sauce, fat-free, gluten-free, nut-free, red pepper, tofu

Product Review: Amy’s Bowls Brown Rice Black Eyed Peas and Veggies

February 27, 2013 by Veronica Grace 5 Comments

Fb-Button

I’m reviewing another Amy’s product. Amy’s Bowls with brown rice, black eyed peas and veggies. I have to admit I don’t really eat black eyed peas, but that’s only because I don’t see them for sale much in Canada. So I was curious to try this. I had previously tried Amy’s Brown Rice and Vegetables Bowl which was ok, and I wanted to compare them. This one I actually like better!

Here’s the ingredients, all vegan.

Nutritional information, a little high in fat and sodium as many Amy’s products tend to be. (For the portion size.)

Taken out of the package.

This meal actually looks pretty nice once it’s reheated. The veggies get a little overcooked in the microwave, but once you mix everything together it’s pretty good. I like the combination of black eyed peas and brown rice and it has a nice flavor. I’m definitely going to seek some out to cook myself.

Here’s my review breakdown.

Basic Nutritional Info: 290 calories 11g of fat, 580 mg of sodium, 11 g of protein

Price: $3.74 USD on sale ($4.99 reg) In Canada about $6.29

Taste: 4/5

Texture: 3/5

Healthfulness: 3/5

Looks: 4/5

Low fat: No

Vegan: Yes

Gluten Free: Yes

Soy Free: No

Nut Free: Yes

GMO Free: Yes

Would I eat it again? I would if it was a good price.

What could be improved? Reduce the amount of sodium and olive oil in the recipe.


Have you ever tried Amy’s Brown Rice, Black Eyed Peas and Vegetables Bowl? What did you think?

This is not a sponsored post. Low Fat Vegan Chef received no compensation for reviewing this product. It’s just a popular brand in the vegetarian community.

Filed Under: Articles, Product Reviews Tagged With: Amy's Bowl, amys kitchen, black eyed peas, brown rice, Product Review, vegetables, vegetarian frozen dinner

How To Cook The Perfect Brown Rice

September 20, 2012 by Veronica Grace 10 Comments

Fb-Button

How To Cook The Perfect Brown Rice


Brown rice takes much longer to cook than white rice and sometimes it can be confusing why your brown rice didn’t turn out if you have never cooked it before. Brown rice is a whole grain and still contains the outer layer of bran. White rice has just been de-hulled and reveals the white endosperm inside. Any rice that contains the outer layer of bran will look brown and can be called brown “rice”.

So let me show you how to cook brown rice in 2 easy ways, on the stovetop or in a rice cooker.

Stove Top Directions For Cooking Brown Rice:

  1. Measure out rice using a measuring cup. Usually it’s 1/3 cup for a small single serving and 1 cup for several servings. You can always make a big batch in advance and reheat it later or use to make rice salad.
  2. Place rice in a mesh strainer or a bowl and rinse with cool water to remove any debris and excess starch.  Drain.
  3. Add rinsed rice to a pot and add 1 ½ times the amount of rice you have in fresh water. For 1 cup of rice, add 1 ½ cups of water.
  4. Put the pot on the stove uncovered and turn the heat to high and bring it to a boil.
  5. Once your water is boiling, turn the heat to a simmer and cover with a lid. If your lid has a hole or steam valve cover it with a little cloth. Let the rice cook at a simmer for about 20 minutes.
  6. Turn off the heat and let the rice sit and steam for another 10 minutes.
  7. Fluff with a fork and serve.
My favorite rice cooker is the Zojirushi 5 1/2 cup (dry amount) rice cooker. It’s designed in Japan and is like the Mercedez of rice cookers. You can program it to cook rice at any hour of the day, but I personally enjoy being able to set it the night before to cook steel cut oats for whole grain oatmeal in the morning. It also has settings for brown rice, white rice, mixed rice, sweet rice, porridge, cake and steaming vegetables. So if you’re looking for an awesome all in 1 grain cooker I recommend this one. If you’re just a single or looker for a cheaper one there’s also the Zojirushi 3 cup (dry amount) rice cooker. 

Rice Cooker Directions For Cooking Brown Rice:

  1. Measure out rice using the measuring cup that comes with rice cooker. Usually it’s 1/3 cup for a small serving and 1 cup for several servings. You can always make a big batch in advance and reheat it later or use to make rice salad.
  2. Place rice in a mesh strainer or in rice cooker pan and rinse with cool water to remove any debris and excess starch.  Drain.
  3. Add rinsed rice back to rice cooker pan and add water to the corresponding water level for brown rice. If your rice cooker pan does not have a brown rice and white rice water line, use 1 ½ times the amount of rice for water. For example: 1 cup of dried brown rice will need 1½ cups of water.
  4. Turn rice cooker on and select brown rice setting. If your rice cooker does not have a brown rice setting, select white rice or just press on/start.
  5. Once cooking is complete and the rice cooker turns to the keep warm setting, let the rice sit and steam for 5-10 minutes before opening. (This helps your grains stay separated and not stick together when you scoop it out.)
  6. Fluff with a fork and serve.

I suggest setting your rice cooker to cook 1 to 2 hours before your main dish is ready to ensure that it is ready on time. For basic rice cookers it’s about 1 hour of cook time, for the Zojirushi it’s about 2 hours because it adds a soaking cycle (and produces better brown rice.)

Filed Under: Articles, Cooked Vegan Recipes, How To, Side Dishes Tagged With: brown rice, cooked recipes, fat-free, gluten-free, how-to, nut-free, soy-free

Primary Sidebar

Follow Us:

Newsletter

Get The Low Fat Vegan Starter Kit

natural organic skin care line

Free Skincare Samples

Earn Free Crypto At Binance

Earn Free Bitcoin on Gemini Exchange

Earn $10 in Bitcoin With Gemini Exchange
Dr. Fuhrman
Dr. Fuhrman
Dr. Fuhrman

Tags

80/10/10 apple avocado banana blueberries breakfast broccoli Carrots celery chickpeas cilantro corn cucumber Curry dill dinner easy Eat To Live fat-free gluten-free how-to Indian Dishes lemon low-fat mango mexican mushrooms nut-free oil-free pasta pineapple plant-based raw raw vegan rice smoothie soup soy-free spinach tofu tomato tomatoes vegan vegetarian vitamix

Secondary Sidebar

Recipes:

  • Cooked Vegan Recipes
  • *My Recipe Books
  • Breads and Baked Goods
  • Breakfast
  • Brunch
  • Burgers
  • Casseroles
  • Curries
  • Desserts
  • Dinner
  • Dips for Veggies or Chips
  • Eat to Live-Dr. Fuhrman Recipes
  • Engine2Diet
  • Ethiopian Dishes
  • Greek
  • Green Dishes
  • Holiday
  • Indian Dishes
  • Mexican
  • One Pot Meals
  • Pasta
  • Pizza
  • Quinoa
  • Salads
  • Sandwiches and Wraps
  • Raw Vegan Recipes
  • 80/10/10
  • Raw Breakfast
  • Raw Desserts
  • Raw Dips
  • Raw Dressings
  • Raw Entrees
  • Raw Juices
  • Raw Salads
  • Raw Smoothies
  • Raw Snacks
  • Raw Soups
  • Sauces
  • Side Dishes
  • Slow Cooker Recipes
  • Snacks
  • Soups and Stews
  • Spices/Seasonings
  • Sushi
  • Thai
  • Vietnamese

Copyright © 2026 · Foodie Pro & The Genesis Framework